
Managing Apicurio Registry content using the web console
You can manage schema and API artifacts stored in Apicurio Registry by using the Apicurio Registry web console.
Navigating the Apicurio Registry dashboard
You can use the Apicurio Registry dashboard to view registry totals, find recently modified artifacts, and open common tasks.
-
You have access to the web console of a running Apicurio Registry instance.
-
In the Apicurio Registry web console, click the Dashboard tab.
The web console also opens the dashboard when you open the root URL of the web console or click the Apicurio Registry logo in the masthead.
-
Review the Groups, Artifacts, and Versions cards to view the totals for your registry.
Click a card to open the Search tab with the corresponding resource type selected.
When usage telemetry is enabled and you are an administrator, the dashboard also displays a Schema Usage card with the number of active, stale, and dead schema versions. -
To open a recently modified artifact, click its name in Recent Artifacts.
The list contains up to 10 artifacts, ordered by modification time with the most recent first.
-
In Quick Actions, click one of the following actions:
-
Create Artifact: Opens the Create Artifact wizard. This action requires permission to create artifacts and a web console with write operations enabled.
-
Search Registry: Opens the Search tab.
-
Explore Groups: Opens the Explore tab, where you can browse groups and their artifacts.
-
Settings: Opens the registry settings. This action requires administrator access and a web console with the settings feature enabled.
-
Configuring the Apicurio Registry web console
You can set optional environment variables to configure the Apicurio Registry web console for your deployment environment or to customize its behavior.
-
You have installed Apicurio Registry.
-
To override the default REST API v3 URL, set the following environment variable in the UI component deployment configuration:
REGISTRY_API_URL: URL for the core Apicurio Registry server REST API v3. For example,https://registry-api.my-domain.com/apis/registry/v3The Apicurio Registry Operator automatically configures the UI component with the REST API v3 URL by default. Set this variable only to override the default value. -
Optional: To enable read-only mode, set the following environment variable:
REGISTRY_FEATURE_READ_ONLY: Set totrueto enable read-only mode. Defaults tofalse.Read-only mode disables all write operations in the Apicurio Registry web console. When enabled, users cannot create groups, create artifacts, upload new artifact versions, update artifact metadata, or delete artifacts.
Viewing artifacts using the Apicurio Registry web console
You can use the Apicurio Registry web console to browse the schema and API artifacts stored in Apicurio Registry.
-
Apicurio Registry is installed and running in your environment.
-
You are logged in to the Apicurio Registry web console:
http://MY_REGISTRY_UI_URL/ -
Artifacts have been added to Apicurio Registry using the web console, command line, Maven plug-in, or a client application.
-
In the Apicurio Registry web console, find the artifact by using one of the following tabs:
-
Explore: Browse the list of groups, click a group, and then click an artifact in the Artifacts in group list.
-
Search: Select Artifacts from the Search for menu to browse artifacts. You can filter the results by criteria such as Name, Group, Labels, or Global Id. When you filter by Type, select the value from a list instead of typing it. The State filter is available when you select Versions from Search for. For this filter, you also select the value from a list.
-
Dashboard: Click an artifact in the Recent Artifacts list.
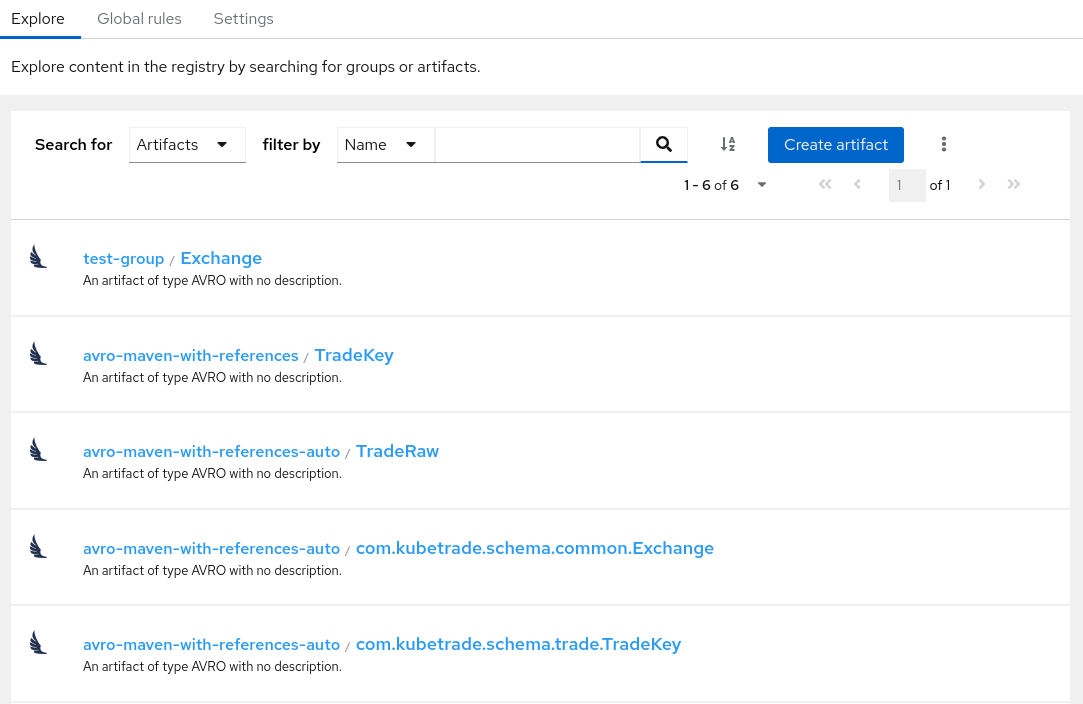 Figure 1. Artifacts in Apicurio Registry web console
-
-
Click the artifact to view the following details:
-
Overview: Displays artifact metadata and the Versions in artifact list. The list is empty if the artifact has no versions.
-
Rules: Displays the content rules that you can configure for the artifact.
-
Branches: Displays a list of branches for the artifact. The tab displays at least the
latestbranch and might display other generated branches depending on your configuration. -
Contract: Displays the data contract metadata, quality score, contract rules, and audit log for the artifact.
-
Usage: Displays which client applications fetch each version of the artifact. The tab displays data only to administrators, and only when usage telemetry is enabled.
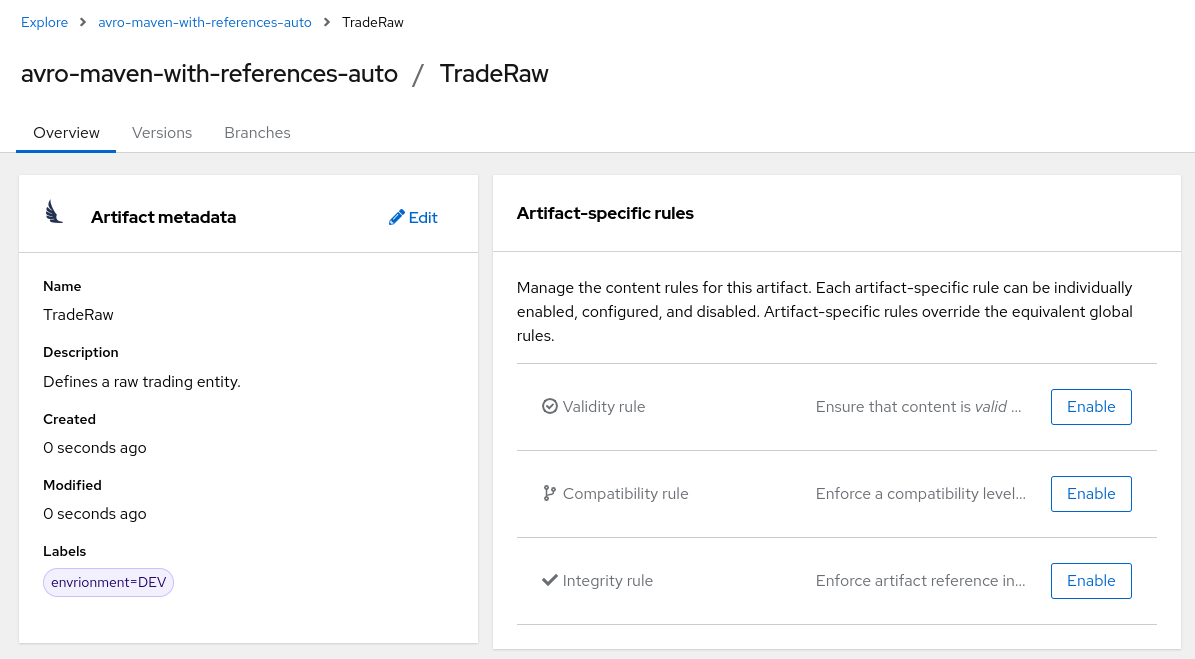 Figure 2. Artifact details in Apicurio Registry web console
-
-
On the artifact’s Overview tab, click a version in the Versions in artifact list, or select View version from the Action menu (three vertical dots) for that version. You can then view the following artifact version details:
-
Overview: Displays artifact version metadata such as version name, description, status, global ID, content ID, and labels. Also displays any comments created for the artifact version.
-
Documentation: Displays a visualization for supported artifact types. For OpenAPI and AsyncAPI, it displays API documentation. For JSON Schema, it displays schema properties and a generated example. The tab is also available for the
AGENT_CARD,MCP_TOOL,MODEL_SCHEMA, andPROMPT_TEMPLATEartifact types, and is hidden for disabled versions. -
Content: Displays a read-only view of the full artifact version content. For JSON content, you can click JSON or YAML to display your preferred format.
-
References: Displays a read-only view of all artifacts referenced by this artifact version. You can also click View artifacts that reference this artifact version. To add references to a new artifact or version, use the Artifact References step when you create it.
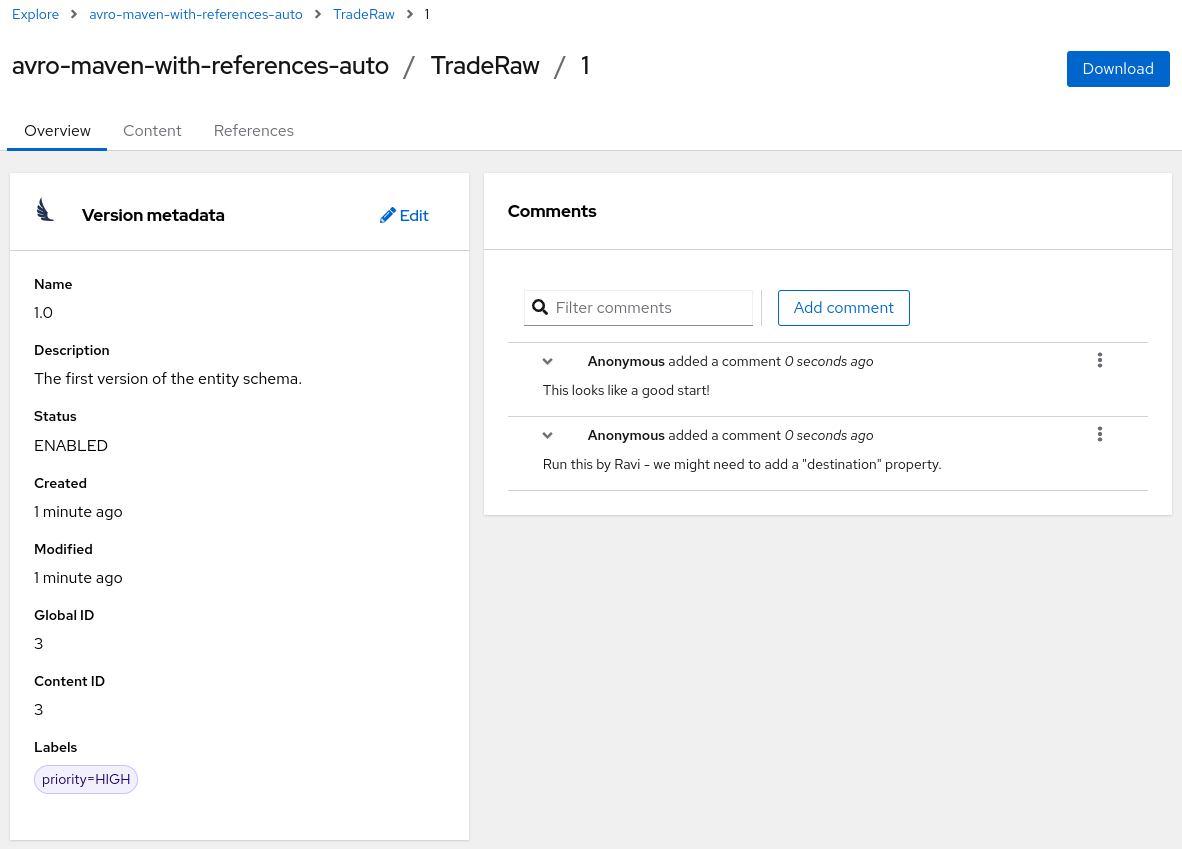 Figure 3. Artifact version details in Apicurio Registry web console
-
-
Click Download to save the artifact contents to a local file.
Comparing artifact versions using the Apicurio Registry web console
You can compare the content of two versions of the same artifact to review schema or API changes.
-
You have access to the web console of a running Apicurio Registry instance.
-
You have an artifact with at least two versions whose content you can retrieve. The web console cannot load the content of a disabled version. If you select one, the Compare Versions dialog displays an error.
-
On the Explore tab, open the group that contains the artifact.
-
Click the artifact to open its details.
-
On the Overview tab, select the check boxes for two versions in the Versions in artifact list.
After you select two versions, the web console disables the remaining check boxes and enables the Compare button. The button label shows the selection count, for example, Compare (2/2). You can select versions on different pages of the list. The selection persists until you clear a check box or click Clear selection.
-
Click Compare to open the Compare Versions dialog.
The comparison displays the older version on the left and the newer version on the right, based on creation time. The comparison is read-only.
-
Optional: Click Inline to display the changes in a single view.
-
Optional: Click Wrap text to wrap long lines.
-
Verify that the Older and Newer labels identify the versions that you selected.
Artifact version states in the Apicurio Registry web console
Each artifact version has a state that identifies its lifecycle stage. The web console displays only the state changes available for the selected version.
| State | Description | Available new states |
|---|---|---|
Draft ( |
A version for preparing content before publication. By default, Apicurio Registry does not apply content rules to a draft until you publish it. You create draft versions on the Drafts tab, which the web console displays only when draft content mutability is enabled and you have the developer or administrator role, or by selecting Create draft from… on a version page. |
Enabled |
Enabled ( |
An active version whose content applications can retrieve. New versions start in this state unless you create them as drafts. The Versions in artifact list displays no badge for enabled versions. |
Deprecated, Disabled |
Deprecated ( |
A version that applications can still retrieve but that you intend to retire. Apicurio Registry adds an |
Enabled, Disabled |
Disabled ( |
A version whose content requests return |
Enabled, Deprecated |
Sunset ( |
A version that has reached the end of its deprecation period. You can set this state only by using the REST API. The web console displays a Sunset badge for the version, but the Change version state dialog displays the current state as Unknown. |
Enabled, Deprecated, Disabled |
You can create a version in the DRAFT state, but you cannot change an existing version back to DRAFT after publication.
Changing an artifact version state using the Apicurio Registry web console
You can change an artifact version’s state to publish a draft, deprecate a version, or disable access to its content.
-
You have access to the web console of a running Apicurio Registry instance, and the web console is not in read-only mode.
-
If authentication is enabled, you have the developer or administrator role. If artifact owner-only authorization is enabled, you are the owner of the artifact or an administrator.
-
You have confirmed that applications no longer need to retrieve the version’s content if you plan to disable it.
-
On the Explore tab, open the group that contains the artifact.
-
Click the artifact to open its details.
-
On the Overview tab, click the version in the Versions in artifact list.
-
On the version’s Overview tab, click Change next to Status.
-
In the Change version state dialog, select a value from the New state list.
For a draft version, the only available value is Enabled. For other versions, select one of the available Enabled, Disabled, or Deprecated values.
Alternatively, you can publish a draft by selecting Finalize draft from the Action menu (three vertical dots) in the version page header, or edit its content by clicking Edit draft.
-
Click Change state.
When you publish a draft, Apicurio Registry applies the configured content rules. If the content violates a rule, the web console displays the Invalid Content Error dialog with the rule violations, and the version remains a draft.
-
Verify that Status on the version’s Overview tab displays the selected state. In the Versions in artifact list, the version displays a Deprecated or Disabled badge, or no badge if you enabled the version.
Viewing a JSON Schema visualization using the Apicurio Registry web console
You can view the properties, constraints, and generated example for a JSON Schema in the web console to review its structure without reading the source content.
-
You have access to the web console of a running Apicurio Registry instance.
-
You have stored a JSON Schema artifact with at least one version in Apicurio Registry. The Documentation tab is not available for disabled versions.
-
On the Explore tab, open the group that contains the JSON Schema artifact.
-
Click the artifact to open its details.
-
On the Overview tab, click the version in the Versions in artifact list.
-
Click the Documentation tab.
The left panel displays the schema title, root type, description, and the Schema row with the
$schemavalue, followed by a Properties section. Each property displays its name, a type badge, and a required marker when the schema requires the property. The property also displays its description, constraints such asminLength,maxLength,min,max,pattern, andformat, enumerated values, and the default value, when the schema defines them. -
Optional: Click Show properties to expand a nested object or array item, or click Hide properties to collapse it.
The web console expands top-level properties by default. The web console lists alternatives that the schema defines with
oneOf,anyOf, orallOfunder One of, Any of, or All of. -
Review the Generated Example panel to see sample JSON content based on the schema.
The web console generates the example from the default values, examples, constants, enumerated values, types, and formats that the schema defines. The generated example is read-only. Viewing it does not change the stored schema.
Adding artifacts using the Apicurio Registry web console
You can use the Apicurio Registry web console to upload schema and API artifacts to Apicurio Registry.
-
Apicurio Registry is installed and running in your environment.
-
You are logged in to the Apicurio Registry web console:
http://MY_REGISTRY_UI_URL/
-
On the Explore tab, click the group in which you want to create the artifact, and then click Create artifact next to Artifacts in group. Alternatively, on the Dashboard tab, click Create Artifact in Quick Actions. Complete the Create Artifact wizard:
You can create a placeholder artifact without content, but you must specify the artifact type, because Apicurio Registry cannot automatically detect the content type. You can create rules first and add content later.
-
Specify the Artifact Coordinates and click Next:
-
Group ID & Artifact ID: Use the default empty settings to automatically generate an artifact ID and add the artifact to the
defaultartifact group. Alternatively, you can enter an optional artifact group or artifact ID. When you start from a group page, the Group Id field is fixed to that group. -
Type: Use the default Auto-Detect setting to automatically detect the artifact type (not allowed if creating an empty artifact), or select the artifact type from the list, for example, Avro Schema or OpenAPI. You must manually select the Kafka Connect Schema artifact type, which cannot be automatically detected.
-
-
Specify the Artifact Metadata and click Next:
-
Name: Enter an optional friendly name for the new artifact.
-
Description: Enter an optional description for the new artifact.
-
Labels: Optionally add one or more label (name/value pair) for the new artifact.
-
-
Specify the Version Content and click Next:
-
Version Number: Optionally add a version string if creating a first version.
-
Content: Specify the content using either of the following options:
-
From file: Click Browse, and select a file, or drag and drop a file. For example,
my-openapi.jsonormy-schema.proto. Alternatively, you can enter the file contents in the text box. -
From URL: Enter a valid and accessible URL, and click Fetch. For example:
https://petstore3.swagger.io/api/v3/openapi.json.
-
-
-
Specify the Version Metadata:
-
Name: Enter an optional friendly name for the first artifact version.
-
Description: Enter an optional description for the first artifact version.
-
Labels: Optionally add one or more label (name/value pair) for the first artifact version.
-
-
Optional: Specify the Artifact References:
-
Click Add reference, and enter the Reference Name, Group Id, Artifact Id, and Version of an artifact that is already stored in Apicurio Registry. All four fields are required for each reference.
-
Alternatively, click Detect references to automatically detect the references in the uploaded content and complete the reference fields.
-
-
-
Click Create and view the artifact details:
-
Overview: Displays artifact metadata and the Versions in artifact list. The list is empty if the artifact has no versions.
-
Rules: Displays the content rules that you can configure for the artifact.
-
Branches: Displays a list of branches for the artifact. The tab displays at least the
latestbranch and might display other generated branches depending on your configuration.
Figure 4. Artifact details in Apicurio Registry web console
-
-
On the Overview tab, click the Edit pencil icon to edit artifact metadata such as name or description.
You can also add zero or more labels (name + value) for categorizing and searching purposes. To add labels:
-
Click Add label.
-
Enter the key name and the value (optional).
-
Repeat the first two steps to add multiple properties.
-
Click Save.
-
-
To save the content of a version to a local file, for example,
my-protobuf-schema.protoormy-openapi.json, click the version in the Versions in artifact list, and then click Download in the version page header. -
To add an artifact version, on the artifact’s Overview tab, click Create version next to Versions in artifact. Specify the following information:
-
Version Number: Optionally add a version string for the new version.
-
Content: Specify the content using either of the following options:
-
From file: Click Browse, and select a file, or drag and drop a file. For example,
my-openapi.jsonormy-schema.proto. Alternatively, you can enter the file contents in the text box. -
From URL: Enter a valid and accessible URL, and click Fetch. For example:
https://petstore3.swagger.io/api/v3/openapi.json.
-
-
Optional: Add artifact references for the new version, either manually or by clicking Detect references.
-
Click Create to create the new version.
-
-
To delete a group, artifact, or artifact version, see the deletion procedures listed in the additional resources.
Deleting groups, artifacts, and artifact versions using the Apicurio Registry web console
You can use the Apicurio Registry web console to delete groups, artifacts, and artifact versions stored in Apicurio Registry. You can delete an entire group, which removes all artifacts in that group. Deleting an artifact removes every version of that artifact. You can also delete a specific artifact version.
| The Apicurio Registry web console disables deletion of groups, artifacts, and artifact versions by default. You must enable deletion in the Apicurio Registry web console Settings before you can delete groups, artifacts, or artifact versions. |
-
Apicurio Registry is installed and running in your environment.
-
You are logged in to the Apicurio Registry web console:
http://MY_REGISTRY_UI_URL/ -
Artifacts have been added to Apicurio Registry.
-
Enable deletion in the Apicurio Registry web console Settings before you delete any content.
-
Delete the group, artifact, or artifact version by following the relevant procedure.
Enabling deletion of groups, artifacts, and artifact versions
Before you can delete groups, artifacts, or artifact versions, you must enable the deletion settings in the Apicurio Registry web console.
| When you enable deletion, users can permanently remove groups, artifacts, and artifact versions. Deleting a group removes all of its artifacts and their versions. Deleting an artifact removes all of its versions. These operations cannot be undone. |
-
In the Apicurio Registry web console, click the Settings tab.
-
In the Additional properties section, select the appropriate settings:
-
Delete group: Select this option to enable deletion of groups.
-
Delete artifact: Select this option to enable deletion of artifacts.
-
Delete artifact version: Select this option to enable deletion of artifact versions.
All three settings are disabled by default. You can enable any combination of these settings depending on your requirements. Alternatively, if you are deploying Apicurio Registry on Kubernetes by using the Apicurio Registry Operator, you can enable deletion by configuring the ApicurioRegistry3custom resource. For more information, see the Apicurio Registry Operator configuration reference in the additional resources.
-
Deleting a group
You can delete a group from Apicurio Registry by using the web console.
| Deleting a group permanently removes the group and all of its artifacts, including all versions. The operation cannot be undone. |
-
On the Explore tab, browse the list of groups stored in Apicurio Registry, or enter a filter string to find the group that you want to delete.
-
Click the group to view its details.
-
In the page header, click Delete group.
-
Confirm the deletion when prompted.
Deleting an artifact
You can delete an artifact from Apicurio Registry by using the web console.
| Deleting an artifact permanently removes the artifact and all of its versions. |
-
On the Explore tab, click the group that contains the artifact, and then click the artifact that you want to delete. Alternatively, find the artifact on the Search tab.
-
In the page header, click Delete artifact.
-
Confirm the deletion when prompted.
Deleting an artifact version
You can delete a specific artifact version from Apicurio Registry by using the web console.
| Deleting an artifact version is permanent and cannot be undone. If you delete the only remaining version, Apicurio Registry also deletes the artifact. |
-
On the Explore tab, click the group that contains the artifact, and then click the artifact that contains the version you want to delete. Alternatively, find the artifact on the Search tab.
-
On the Overview tab, find the version in the Versions in artifact list, and select Delete version from the Action menu (three vertical dots) for that version.
-
Confirm the deletion when prompted.
Configuring content rules using the Apicurio Registry web console
You can use the Apicurio Registry web console to configure optional rules to prevent invalid or incompatible content from being added to Apicurio Registry. All configured artifact-specific, group-specific, or global rules must pass before Apicurio Registry accepts a new artifact version. Artifact-specific rules override group-specific rules, which in turn override global rules.
-
Apicurio Registry is installed and running in your environment.
-
You are logged in to the Apicurio Registry web console:
http://MY_REGISTRY_UI_URL/ -
Artifacts have been added to Apicurio Registry using the web console, command line, Maven plug-in, or a Java client application.
-
When role-based authorization is enabled, you have administrator access for global rules configuration.
-
To configure group-specific rules:
-
On the Explore tab, browse the list of groups in Apicurio Registry.
-
Click a group to view its details, and then click the Rules tab.
-
In Group-specific rules, click Enable to configure a validity, compatibility, or integrity rule for all artifact content in the group, and select the appropriate rule configuration from the list. For example, for Validity rule, select Full.
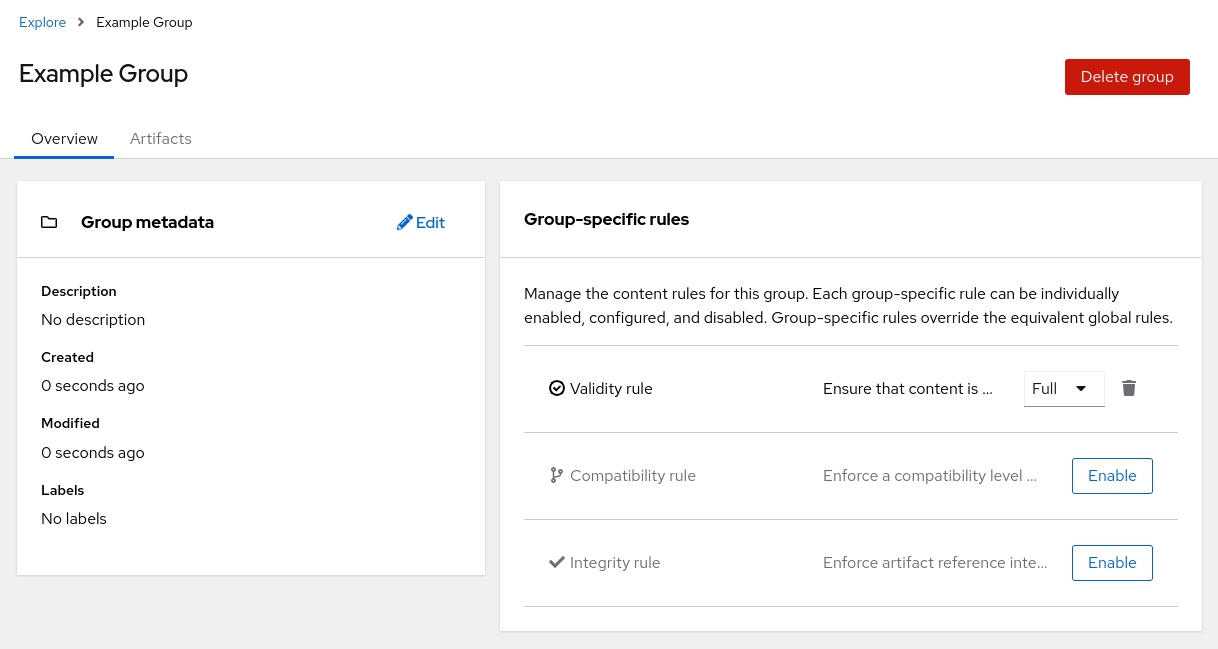 Figure 5. Group-specific rules in Apicurio Registry web console
-
-
To configure artifact-specific rules:
-
On the Search tab, browse the list of artifacts in Apicurio Registry by selecting Artifacts from the Search for menu.
-
Click an artifact from the list to view its details, and then click the Rules tab.
-
In Artifact-specific rules, click Enable to configure a validity, compatibility, or integrity rule for artifact content, and select the appropriate rule configuration from the list. For example, for Validity rule, select Full.
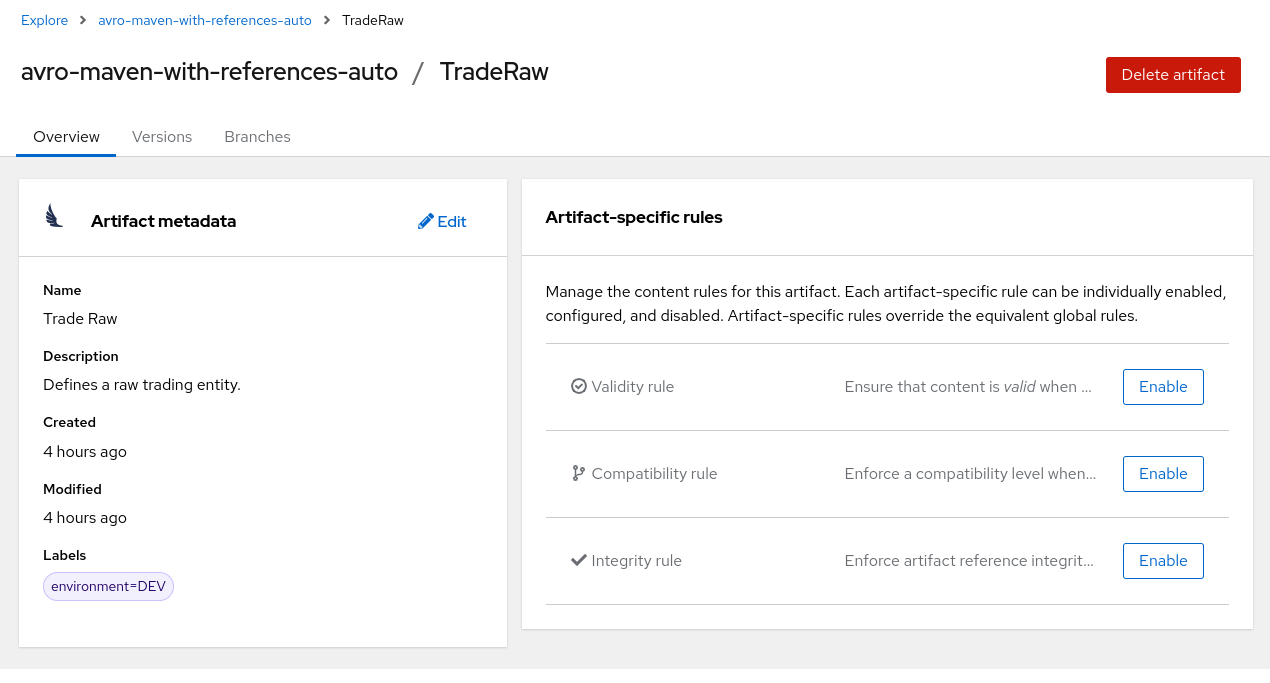 Figure 6. Artifact content rules in Apicurio Registry web console
-
-
To configure global rules:
-
Click the Global rules tab.
-
Click Enable to configure global validity, compatibility, or integrity rules for all artifact content, and select the appropriate rule configuration from the list.
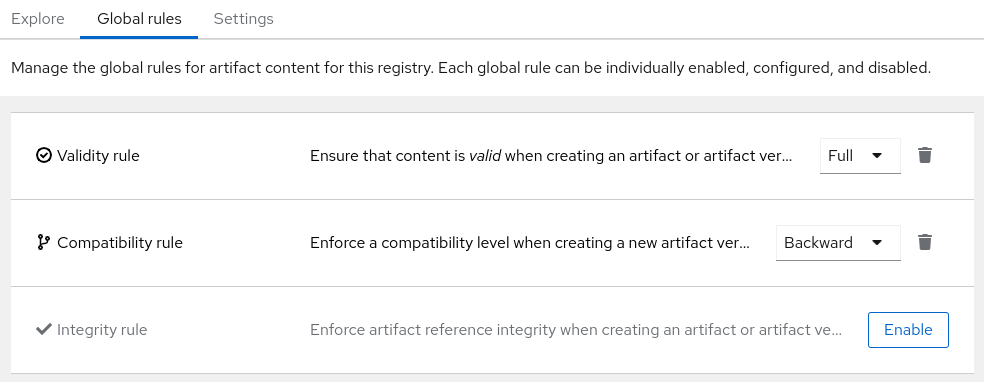 Figure 7. Artifact content rules in Apicurio Registry web console
To disable a rule, click the trash icon next to the rule. If you do this and the rule is configured at a higher level, for example Global, Apicurio Registry applies the higher-level rule configuration again.
-
Changing an artifact owner using the Apicurio Registry web console
As an administrator or as an artifact owner, you can use the Apicurio Registry web console to change the artifact owner to another user account.
If the Artifact owner-only authorization option is enabled on the Settings tab, only artifact owners or administrators can modify artifacts. You might need to change the owner if the owner user leaves the organization, the owner account no longer exists, or you need to transfer modification access to another user.
| Apicurio Registry displays the Artifact owner-only authorization setting and the artifact Owner field only when authentication was enabled during deployment. For more information, see |
-
Apicurio Registry is running and the artifact exists.
-
You are logged in to the Apicurio Registry web console as the artifact’s current owner or as an administrator:
http://MY_REGISTRY_UI_URL/
-
On the Explore tab, click the group that contains the artifact, and then click the artifact that you want to reassign. Alternatively, find the artifact on the Search tab by using a filter such as Name, Group, Labels, or Global Id.
-
On the Overview tab, click the pencil icon next to the Owner field in the Artifact metadata panel.
-
In the New owner field, enter the user name of the new owner.
-
Click Change owner.
Changing a group owner using the Apicurio Registry web console
You can transfer ownership of a group to another user account when responsibility for the group changes. Changing a group owner does not change the owners of artifacts in that group.
-
You have a running Apicurio Registry instance with authentication enabled and write operations enabled in the web console and storage.
-
You have a group other than
defaultwith an assigned owner. The web console does not provide an owner field for thedefaultgroup. -
You have logged in to the web console as the current group owner with write access or as an administrator.
-
You have the user name of the account that you want to assign as the group owner.
-
On the Explore tab, click the group that you want to reassign.
Alternatively, on the Search tab, select Groups from the Search for menu, find the group, and then click it.
-
On the Overview tab, click the pencil icon next to Owner in the Group metadata panel.
-
In the Change owner dialog, enter the user name of the new owner in the New owner field.
-
Click Change owner.
-
Verify that Owner in the Group metadata panel displays the new user name.
Configuring Apicurio Registry settings using the web console
As an administrator, you can use the Apicurio Registry web console to configure dynamic settings for Apicurio Registry at runtime. You can manage configuration options for features such as authentication, authorization, and API compatibility.
| Apicurio Registry displays authentication and authorization settings in the web console only when authentication was already enabled during deployment. For more information, see Configuring your Apicurio Registry deployment. |
-
Apicurio Registry is running.
-
You are logged in to the Apicurio Registry web console with administrator access:
http://MY_REGISTRY_UI_URL/
-
In the Apicurio Registry web console, click the Settings tab.
-
Select the settings that you want to configure for Apicurio Registry:
Table 2. Authentication settings Setting Description HTTP basic authentication
Displayed only when authentication is already enabled (during deployment). When selected, Apicurio Registry users can authenticate using HTTP basic authentication, in addition to OAuth. Not selected by default.
Table 3. Authorization settings Setting Description Anonymous read access
Displayed only when authentication is already enabled. When selected, Apicurio Registry grants read-only access to requests from anonymous users without any credentials. Use this setting to publish schemas or APIs externally. Not selected by default.
Artifact owner-only authorization
Displayed only when authentication is already enabled. When selected, only the user who created an artifact can modify that artifact. Not selected by default.
Artifact group owner-only authorization
Displayed only when authentication is already enabled and Artifact owner-only authorization is also enabled. When selected, only the user who created an artifact group has write access to that artifact group, for example, to add or remove artifacts in that group. Not selected by default.
Authenticated read access
Displayed only when authentication is already enabled. When selected, Apicurio Registry grants at least read-only access to requests from any authenticated user regardless of their user role. Not selected by default.
Table 4. Compatibility settings Setting Description Canonical hash mode (compatibility API)
When selected, the Schema Registry compatibility API uses the canonical hash instead of the regular hash of the content.
Legacy ID mode (compatibility API)
When selected, the Confluent Schema Registry compatibility API uses
globalIdinstead ofcontentIdas an artifact identifier.Maximum number of subjects returned (compatibility API)
Sets the maximum number of subjects that the Confluent Schema Registry compatibility API returns (for the
/subjectsendpoint).Table 5. Web console settings Setting Description Download link expiry
The number of seconds that a generated link to a
.zipdownload file is active before expiring for security reasons, for example, when exporting artifact data from Apicurio Registry. Defaults to 30 seconds.Table 6. Semantic versioning settings Setting Description Automatically create semver branches
When enabled, automatically create or update branches for major ('A.x') and minor ('A.B.x') artifact versions.
Ensure all version numbers are 'semver' compatible
When enabled, validate that all artifact versions conform to Semantic Versioning 2 format (https://semver.org).
Table 7. Additional properties Setting Description Delete artifact
When selected, users can delete artifacts in Apicurio Registry by using the Core Registry API. Not selected by default.
Delete artifact version
When selected, users can delete artifact versions in Apicurio Registry by using the Core Registry API. Not selected by default.
Delete group
When selected, users can delete groups in Apicurio Registry by using the Core Registry API. Not selected by default.
Storage read-only mode
When selected, Apicurio Registry returns an error for operations that write to the storage (this property excepted). Not enabled by default.
Exporting and importing data using the Apicurio Registry web console
As an administrator, you can use the Apicurio Registry web console to export data from one Apicurio Registry instance and import it into another Apicurio Registry instance. You can use this to migrate data between Apicurio Registry instances.
You export all artifact data from a source Apicurio Registry instance to a .zip file, then import the file into a target instance.
-
You have set up the following Apicurio Registry instances:
-
The source instance that you are exporting from contains at least one schema or API artifact
-
The target instance that you are importing into is empty to preserve unique IDs
-
-
You are logged in to the Apicurio Registry web console with administrator access:
http://MY_REGISTRY_UI_URL/
-
In the web console for the source Apicurio Registry instance, view the Explore tab.
-
Click the Admin actions icon (three vertical dots) next to Create group in the toolbar, and select Export all (as .ZIP) to export the data for this Apicurio Registry instance to a
.zipdownload file.The Admin actions menu is available only to administrators. When the web console is in read-only mode (
apicurio.ui.features.read-only.enabled=true), the menu offers only Export all (as .ZIP). -
In the web console for the target Apicurio Registry instance, view the Explore tab.
-
Click the Admin actions icon (three vertical dots) next to Create group in the toolbar, and select Import from .ZIP.
-
Drag and drop or browse to the
.zipdownload file that you exported earlier. -
Click Import and wait for Apicurio Registry to import the data.