
Managing Apicurio Registry content using the web console
This chapter explains how to manage schema and API artifacts stored in the registry using the Apicurio Registry web console. This includes uploading and browsing registry content, and configuring optional rules:
Configuring the Apicurio Registry web console
You can configure the Apicurio Registry web console specifically for your deployment environment or to customize its behavior. This section provides details on how to configure optional environment variables for the Apicurio Registry web console.
-
You must have already installed Apicurio Registry.
Configuring the web console deployment environment
When a user navigates their browser to the Apicurio Registry web console, some initial configuration settings are loaded. Two important configuration properties are:
-
URL for backend Apicurio Registry REST API
-
URL for frontend Apicurio Registry web console
Typically, Apicurio Registry automatically detects and generates these settings, but there are some deployment environments where this automatic detection can fail. If this happens, you can configure environment variables to explicitly set these URLs for your environment.
Configure the following environment variables to override the default URLs:
-
REGISTRY_UI_CONFIG_APIURL: Set the URL for the backend Apicurio Registry REST API. For example,https://registry.my-domain.com/apis/registry -
REGISTRY_UI_CONFIG_UIURL: Set the URL for the frontend Apicurio Registry web console. For example,https://registry.my-domain.com/ui
Configuring the console in read-only mode
You can configure the Apicurio Registry web console in read-only mode as an optional feature. This mode disables all features in the Apicurio Registry web console that allow users to make changes to registered artifacts. For example, this includes the following:
-
Creating an artifact
-
Uploading a new version of an artifact
-
Updating an artifact’s metadata
-
Deleting an artifact
Configure the following environment variable to set the Apicurio Registry web console in read-only mode:
-
REGISTRY_UI_FEATURES_READONLY: Set totrueto enable read-only mode. Defaults tofalse.
Adding artifacts using the Apicurio Registry web console
You can use the Apicurio Registry web console to upload event schema and API design artifacts to the registry. For more details on the artifact types that you can upload, see Apicurio Registry artifact and rule reference. This section shows simple examples of uploading Apicurio Registry artifacts, applying artifact rules, and adding new artifact versions.
-
Apicurio Registry must be installed and running in your environment.
-
Connect to the Apicurio Registry web console on:
http://MY_REGISTRY_URL/ui -
Click Upload artifact, and specify the following:
-
Group & ID: Use the default empty settings to automatically generate an ID and
defaultgroup, or enter an optional artifact group or ID. -
Type: Use the default Auto-Detect setting to automatically detect the artifact type, or select the artifact type from the drop-down, for example, Avro Schema or OpenAPI.
The Apicurio Registry server cannot automatically detect the Kafka Connect Schema artifact type. You must manually select this artifact type. -
Artifact: Drag and drop or click Browse to upload a file, for example,
my-schema.jsonormy-openapi.json.
-
-
Click Upload and view the Artifact Details:
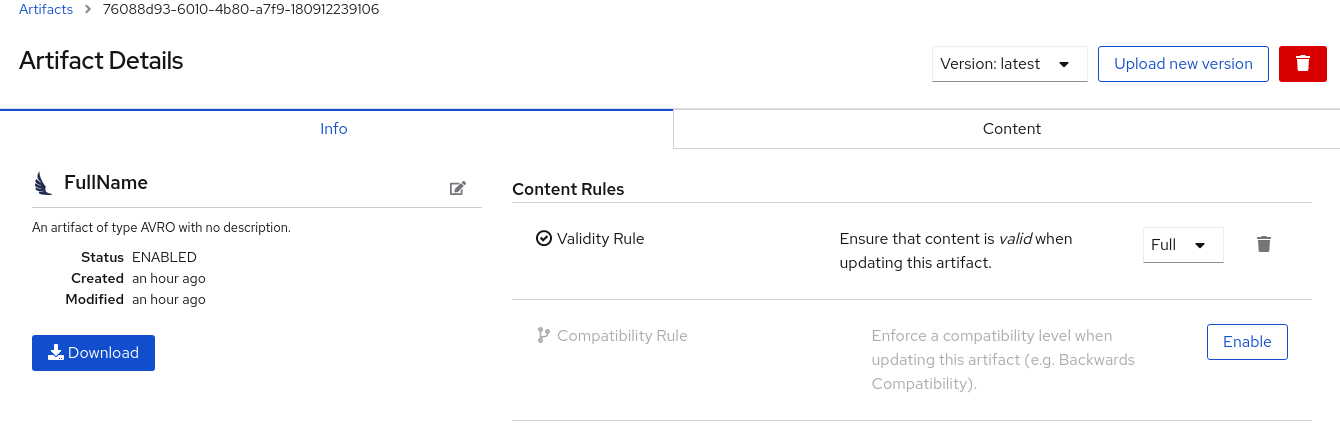 Figure 1. Artifact Details in Apicurio Registry web console
-
Info: Displays the artifact name and optional group, description, lifecycle status, when created, and last modified. Click the Edit Artifact Metadata pencil icon to edit the artifact name and description or add labels, and click Download to download the artifact file locally. Also displays artifact Content Rules that you can enable and configure.
-
Documentation (OpenAPI only): Displays automatically-generated REST API documentation.
-
Content: Displays a read-only view of the full artifact content.
-
-
In Content Rules, click Enable to configure a Validity Rule or Compatibility Rule, and select the appropriate rule configuration from the drop-down. For more details, see Apicurio Registry artifact and rule reference.
-
Click Upload new version to add a new artifact version, and drag and drop or click Browse to upload the file, for example,
my-schema.jsonormy-openapi.json. -
To delete an artifact, click the trash icon next to Upload new version.
Deleting an artifact deletes the artifact and all of its versions, and cannot be undone. Artifact versions are immutable and cannot be deleted individually.
Viewing artifacts using the Apicurio Registry web console
You can use the Apicurio Registry web console to browse the event schema and API design artifacts stored in the registry. This section shows simple examples of viewing Apicurio Registry artifacts, groups, versions, and artifact rules. For more details on the artifact types stored in the registry, see Apicurio Registry artifact and rule reference.
-
Apicurio Registry must be installed and running in your environment.
-
Artifacts must have been added to the registry using the Apicurio Registry web console, REST API commands, Maven plug-in, or a Java client application.
-
Connect to the Apicurio Registry web console on:
http://MY_REGISTRY_URL/ui -
Browse the list of artifacts stored in the registry, or enter a search string to find an artifact. You can select to search by a specific Name, Group, Description, or Labels.
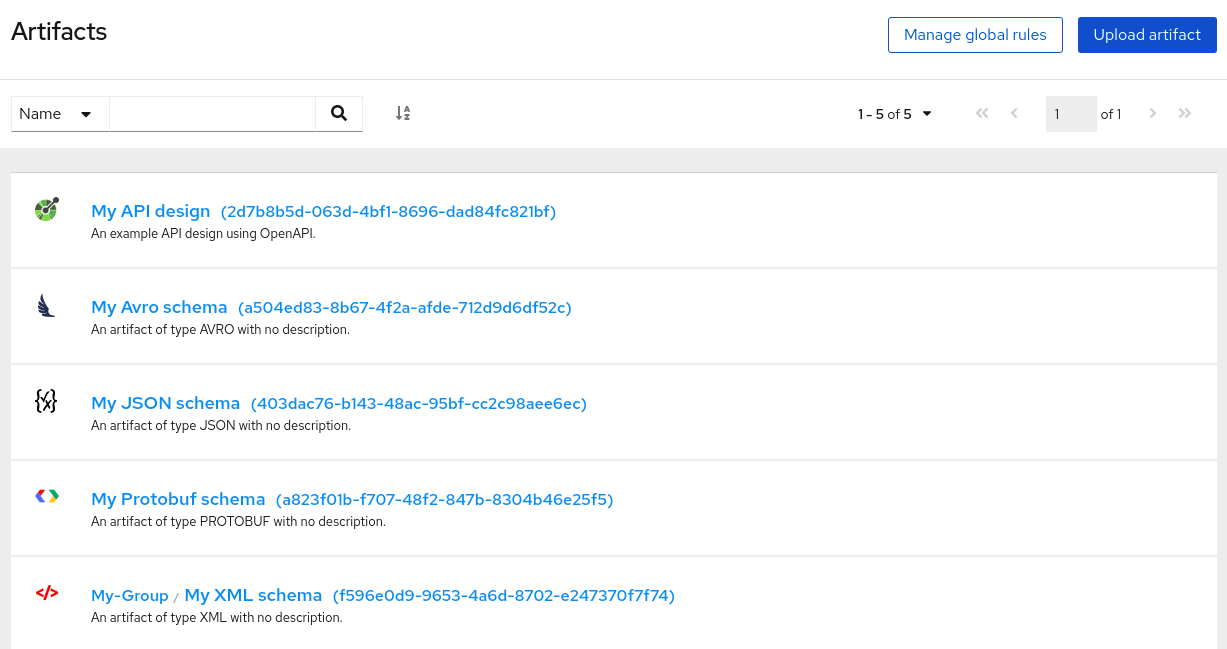 Figure 2. Browse artifacts in Apicurio Registry web console
 -
Click View artifact to view the Artifact Details:
-
Info: Displays the artifact name and optional group, description, lifecycle status, when created, and last modified. Click the Edit Artifact Metadata pencil icon to edit the artifact name and description or add labels, and click Download to download the artifact file locally. Also displays artifact Content Rules that you can enable and configure.
-
Documentation (OpenAPI only): Displays automatically-generated REST API documentation.
-
Content: Displays a read-only view of the full artifact content.
-
-
Select to view a different artifact Version from the drop-down, if additional versions have been added.
Configuring content rules using the Apicurio Registry web console
You can use the Apicurio Registry web console to configure optional rules to prevent invalid content from being added to the registry. All configured artifact rules or global rules must pass before a new artifact version can be uploaded to the registry. Configured artifact rules override any configured global rules. For more details, see Introduction to Apicurio Registry rules.
This section shows a simple example of configuring global and artifact rules. For details on the different rule types and associated configuration settings that you can select, see Apicurio Registry artifact and rule reference.
-
Apicurio Registry must be installed and running in your environment.
-
For artifact rules, artifacts must have been added to the registry using the Apicurio Registry web console, REST API commands, Maven plug-in, or a Java client application.
-
Connect to the Apicurio Registry web console on:
http://MY_REGISTRY_URL/ui -
For artifact rules, browse the list of artifacts stored in the registry, or enter a search string to find an artifact. You can select to search by a specific artifact Name, Group, Description, or Labels.
-
Click View artifact to view the Artifact Details.
-
In Content Rules, click Enable to configure an artifact Validity Rule or Compatibility Rule, and select the appropriate rule configuration from the drop-down. For more details, see Apicurio Registry artifact and rule reference.
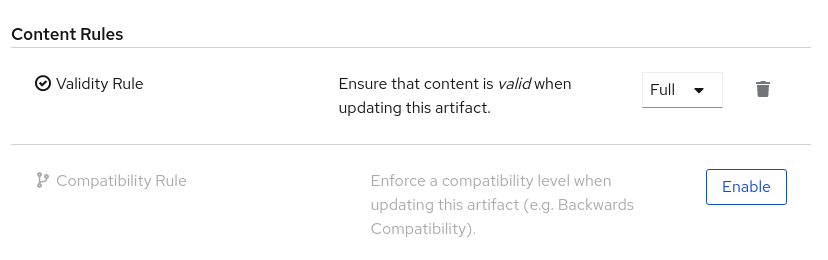 Figure 3. Configure content rules in Apicurio Registry web console
 -
For global rules, click Manage global rules at the top right of the toolbar, and click Enable to configure a global Validity Rule or Compatibility Rule, and select the appropriate rule configuration from the drop-down. For more details, see Apicurio Registry artifact and rule reference.
-
To disable an artifact rule or global rule, click the trash icon next to the rule.