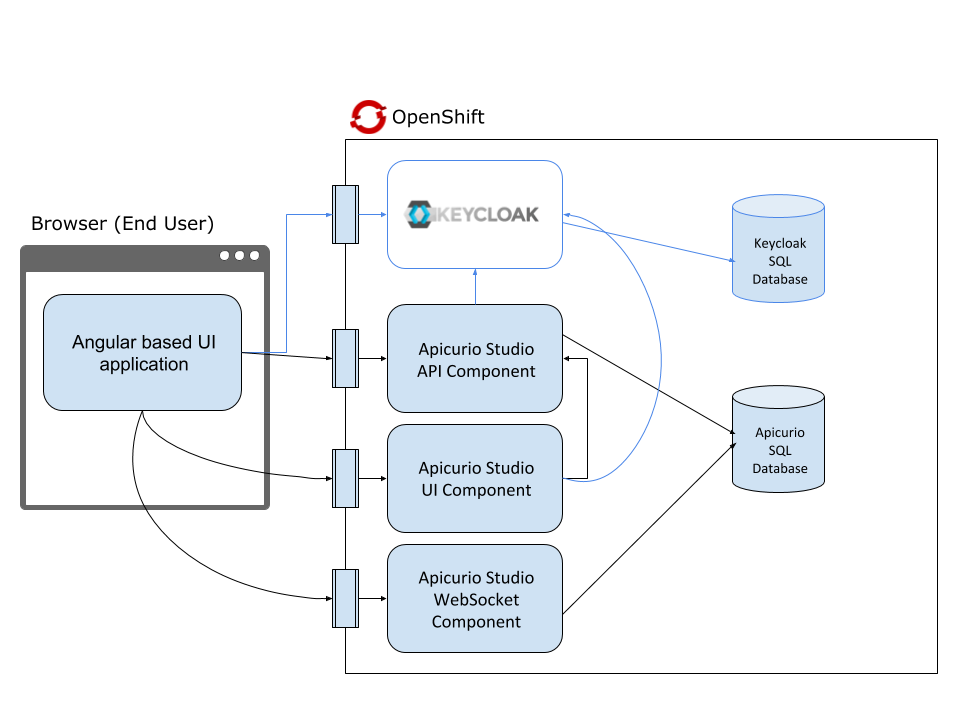
The fastest way to get started with Apicurio Studio is to download the official Quickstart and simply fire it up. However, if you’re serious about running a local instance of Apicurio Studio you’re likely going to want to run it in some sort of container based platform like OpenShift. For that, you’ll want a better understanding of the architecture and how to split things up in a way that makes sense for a production deployment.
So you may be asking why you can’t just deploy the full Quickstart as a pod in OpenShift and call it a day. I guess there’s no reason that wouldn’t work, but the Apicurio Studio Quickstart is very much designed as an evaluation deployment, not really intended for deployment in production. It would probably work, but it’s not a very good unit of scaling, which is an important consideration when deploying in a container environment.
This section attempts to provide a good overview of the architecture of the application from a devops perspective.
There are three runtime components in Apicurio Studio and one Keycloak authentication server. This article will focus on the three core Apicurio Studio components and will assume that you have a Keycloak server running somewhere with appropriate external access (has a public route).
Each of the components interacts with zero or more of the others in a variety of ways. Let’s explore these interactions.
You may be wondering where you can find Docker images for each of the Apicurio Studio components. Here are some helpful links to Docker Hub:
Docker Image Documentation
Usage and startup options are (hopefully) well documented in Docker Hub for each of the images listed above. Have a look at each image to learn more about how to configure it and start it up.
Starting up a docker image for the SQL database and Keycloak authentication servers are topics that are out of scope for this article.
They say that a picture is worth a thousand words, so let’s give an architecture diagram a shot.

Now that you have an understanding of all the pieces, let’s explore how to install Apicurio Studio in OpenShift. Fortunately, we have a template file that can hopefully act as a starting point for this. It is recommended that you download the OpenShift Template and then modify it to suit your environment.
The Apicurio Studio OpenShift template contains the following entities/objects:
The template includes a number of parameters that can be filled out when installing it in OpenShift. Check the end of the template file to see a list of these parameters.
All of the objects/entities found in the template are necessary for Apicurio Studio to properly function, and using the template as-is should result in a functioning application. However, there are some changes that you will likely want to make when designing a production deployment of Apicurio.
The Apicurio Studio OpenShift template includes a custom-configured version of Keycloak because it is required for Apicurio Studio to function. However, this version of Keycloak is a convenience only - and you should check with the Keycloak project if you want a truly production quality Keycloak instance deployed to OpenShift.
Apicurio Studio’s API and WebSocket components require a shared SQL database. The template provides a PostgreSQL database for this purpose, but it is not necessarily one that is configured to hold up well in production. You may want to stand up a PostgreSQL (or MySQL) database using best practices defined within the database and/or OpenShift community.
Also note that when deployed in production, the Keycloak server will need its own SQL database instance. A Keycloak SQL database is not currently installed as part of the Apicurio Studio OpenShift template. Instead, Keycloak is configured to work with an embedded H2 database - another reason you should be diligent about deploying Keycloak properly in production.
It is very important that all of the main components (Auth, API, WS, and UI) have external routes so that the user can access each component separately from a browser.