
Hey everyone, in our previous blog post, we covered the authentication process using Azure Entra ID (formerly Azure AD).
In this technical guide, we will provide a step-by-step approach to securing both the Apicurio Registry UI and API. By the end, you’ll be ready to protect your Apicurio Registry using Azure Entra ID effectively. Let’s dive in!.
Core Features
In this blog post, we will cover the following:
- Step-by-Step Authentication/Authorization Configuration Entra-ID to secure ApiCurio Registry - A detailed walkthrough for securing the Apicurio Registry UI and API using Azure Entra ID.
Part I: Access to the UI secured with Azure Entra ID
1. Create subscription for service registry operator:
oc create -f - <<EOF
apiVersion: operators.coreos.com/v1alpha1
kind: Subscription
metadata:
  labels:
    operators.coreos.com/service-registry-operator.openshift-operators: ""
  name: service-registry-operator
  namespace: openshift-operators
spec:
  channel: 2.x
  installPlanApproval: Automatic
  name: service-registry-operator
  source: redhat-operators
  sourceNamespace: openshift-marketplace
  startingCSV: service-registry-operator.v2.6.1
EOF

2. Install ApiCurio Registry 2.x
2.1 - Install Postgres DB
oc new-project registry
oc new-app -e POSTGRESQL_USER=psql -e POSTGRESQL_PASSWORD=password -e POSTGRESQL_DATABASE=apicurio postgresql
Check that the postgres is running 1/1:
oc get pods -n registry
2.2 Create Simple ApiCurio Registry NONE Secure:
oc apply -f - <<EOF
apiVersion: registry.apicur.io/v1
kind: ApicurioRegistry
metadata:
  name: apicurioregistry-psql
spec:
  configuration:
    logLevel: DEBUG
    registryLogLevel: DEBUG
    security:
      https:
        disableHttp: true
    persistence: "sql"
    sql:
      dataSource:
        url: "jdbc:postgresql://postgresql:5432/apicurio"
        userName: "psql"
        password: "password"
EOF
output:
apicurioregistry.registry.apicur.io/apicurioregistry-psql created
oc get pods
NAME                                                READY   STATUS    RESTARTS   AGE
apicurioregistry-psql-deployment-67996897df-8426x   1/1     Running   0          89s
postgresql-67b7c66db-wcfck                          1/1     Running   0          6m37s
oc get svc
NAME TYPE CLUSTER-IP EXTERNAL-IP PORT(S) AGE
apicurioregistry-psql-service ClusterIP 172.30.216.0 <none> 8080/TCP 116s
postgresql ClusterIP 172.30.209.37 <none> 5432/TCP 7m3s
oc get routes
NAME                                  HOST/PORT                                                                                 PATH   SERVICES                        PORT   TERMINATION   WILDCARD
apicurioregistry-psql-ingress-hnz2f   apicurioregistry-psql.registry.router-default.apps.com   /      apicurioregistry-psql-service   http                 None
2.3 Create Route for HTTPS (outside connection) required for the Azure Entra ID (AD) for the redirect URL:
- NOTE: Change the
hostfor your Apicurio Registry Console. you can get it fromoc get route.
oc create -f - <<EOF
kind: Route
apiVersion: route.openshift.io/v1
metadata:
  name: apicurioregistry-psql
  labels:
    app: apicurioregistry-psql
spec:
  host: apicurioregistry-psql.registry.router-default.apps.com
  to:
    kind: Service
    name: apicurioregistry-psql-service
    weight: 100
  port:
    targetPort: 8080
  tls:
    termination: edge
    insecureEdgeTerminationPolicy: Redirect
  wildcardPolicy: None
EOF
output:
route.route.openshift.io/apicurioregistry-psql created
3. Secure the ApiCurio Registry with Azure Entra ID:
- Login to https://portal.azure.com/
- Follow the steps in the blog (Chapter - Azure Entra ID Configuration): Blog https://www.apicur.io/blog/2023/07/13/registry-azure-ad
Prepare the values for the following env from the app registration apicurio-registry-example in Azure Entra ID:
Auth OIDC settings:
REGISTRY_AUTH_ENABLED=true
KEYCLOAK_API_CLIENT_ID=459569e9-c5f7-410a-a6e7-8db28d7e3647 #Azure AD > Admin > App registrations > Your app > Application (client) ID
REGISTRY_UI_AUTH_TYPE=oidc
REGISTRY_AUTH_URL_CONFIGURED=https://login.microsoftonline.com/6f9ef45b-456d-49e3-b5ba-1f6fe4c0fb78/v2.0 #Azure AD > Admin > App registrations > Your app > Directory (tenant) ID
REGISTRY_OIDC_UI_CLIENT_ID=459569e9-c5f7-410a-a6e7-8db28d7e3647 #Azure AD > Admin > App registrations > Your app > Application (client) ID
Redirect Settings:
- Change the host for your Apicurio Registry deployment (
oc get route)CORS_ALLOWED_ORIGINS=https://apicurioregistry-psql.registry.router-default.apps.com #The host for your Apicurio Registry deployment REGISTRY_OIDC_UI_REDIRECT_URL=https://apicurioregistry-psql.registry.router-default.apps.com/ui/ #The host for your Apicurio Registry consoleAuthorization settings:
ROLE_BASED_AUTHZ_ENABLED=true
QUARKUS_OIDC_ROLES_ROLE_CLAIM_PATH=roles
Apply the new env var settings to the existing CR apicurioregistry-psql:
oc apply -f - <<EOF
apiVersion: registry.apicur.io/v1
kind: ApicurioRegistry
metadata:
  name: apicurioregistry-psql
spec:
  configuration:
    env:
      - name: REGISTRY_AUTH_ENABLED
        value: 'true'
      - name: REGISTRY_AUTH_RBAC_ENABLED
        value: 'true'
      - name: KEYCLOAK_API_CLIENT_ID
        value: '1fc88f64-2303-42f6-b9df-609edee94efe'
      - name: REGISTRY_UI_AUTH_TYPE
        value: 'oidc'
      - name: REGISTRY_AUTH_URL_CONFIGURED
        value: 'https://login.microsoftonline.com/64dc69e4-d083-49fc-9569-ebece1dd1408/v2.0'
      - name: REGISTRY_OIDC_UI_CLIENT_ID
        value: '1fc88f64-2303-42f6-b9df-609edee94efe'
      - name: CORS_ALLOWED_ORIGINS
        value: 'https://apicurioregistry-psql.registry.router-default.apps.com'
      - name: REGISTRY_OIDC_UI_REDIRECT_URL
        value: 'https://apicurioregistry-psql.registry.router-default.apps.com/ui/'
      - name: ROLE_BASED_AUTHZ_ENABLED
        value: 'true'
      - name: QUARKUS_OIDC_ROLES_ROLE_CLAIM_PATH
        value: 'roles'
      - name: registry.ccompat.max-subjects
        value: '2000'
      - name: CLIENT_CREDENTIALS_BASIC_AUTH_ENABLED
        value: 'true'
      - name: AUTH_ENABLED
        value: 'true'
      - name: CORS_ALLOWED_METHODS
        value: 'GET,PUT,POST,PATCH,DELETE,OPTIONS'
      - name: CORS_ALLOWED_HEADERS
        value: >-
          x-registry-name,x-registry-name-encoded,x-registry-description,x-registry-description-encoded,x-registry-version,x-registry-artifactid,x-registry-artifacttype,x-registry-hash-algorithm,x-registry-content-hash,access-control-request-method,access-control-allow-credentials,access-control-allow-origin,access-control-allow-headers,authorization,content-type
    logLevel: DEBUG
    registryLogLevel: DEBUG
    security:
      https:
        disableHttp: true
    persistence: "sql"
    sql:
      dataSource:
        url: "jdbc:postgresql://postgresql:5432/apicurio"
        userName: "psql"
        password: "password"
EOF
Login to your ApiCurio Registry Route HTTPS URL.
Part II: Machine to machine communication (Client Credentials Grant)
Apart from having users accessing the UI, it is quite frequent to have the requirement of doing machine to machine authentication, especially in the context of something like Apache Kafka. To do this, you can configure your setup to use the Client Credentials Grant using Entra ID. This can be achieved with the following steps:
1. App Registration:
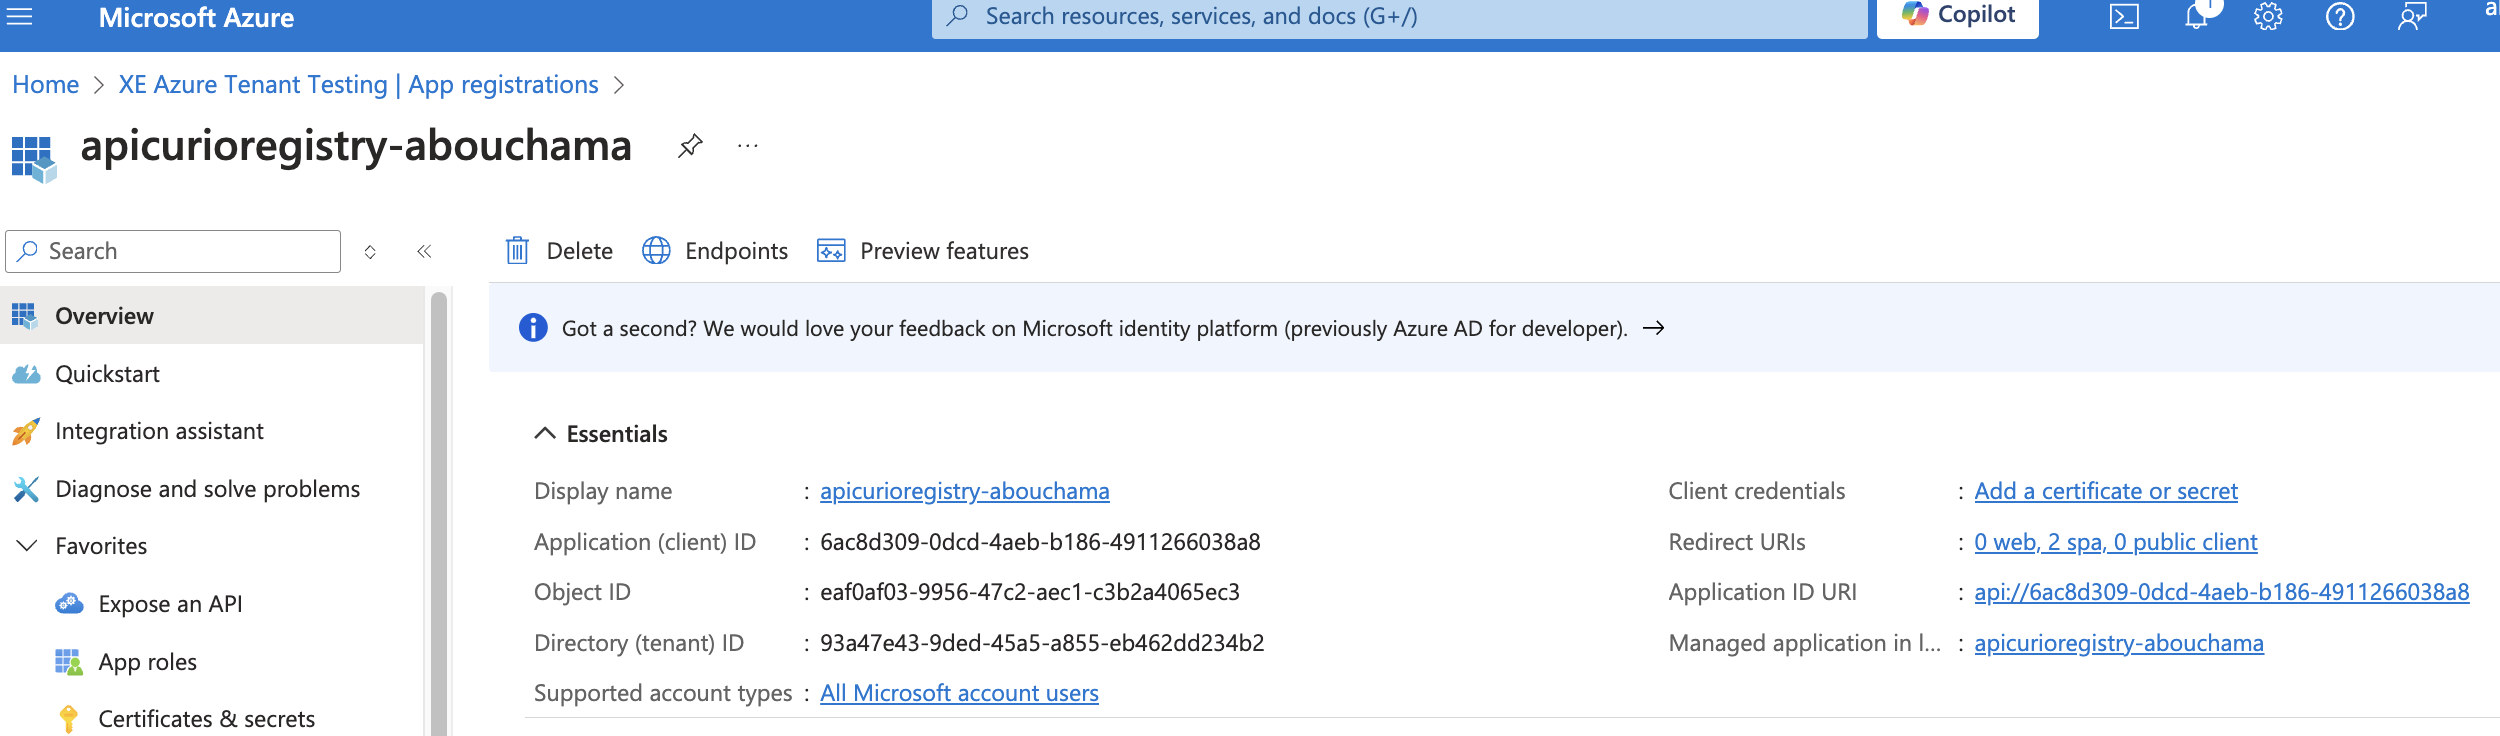
First, your app needs to register with the API provider. It gets a client ID (like a username) and a client secret (like a password). This is a unique key just for your app.
Here are the steps:
- Create a
new app registrationthat represents your client application. You can leave everything blank in the creation screen besides the name. -
In the
Overviewtab of yournew application registration, Click on the link ofClient credentials, you will be redirected to a pageCertificates & secrets: create a new secret.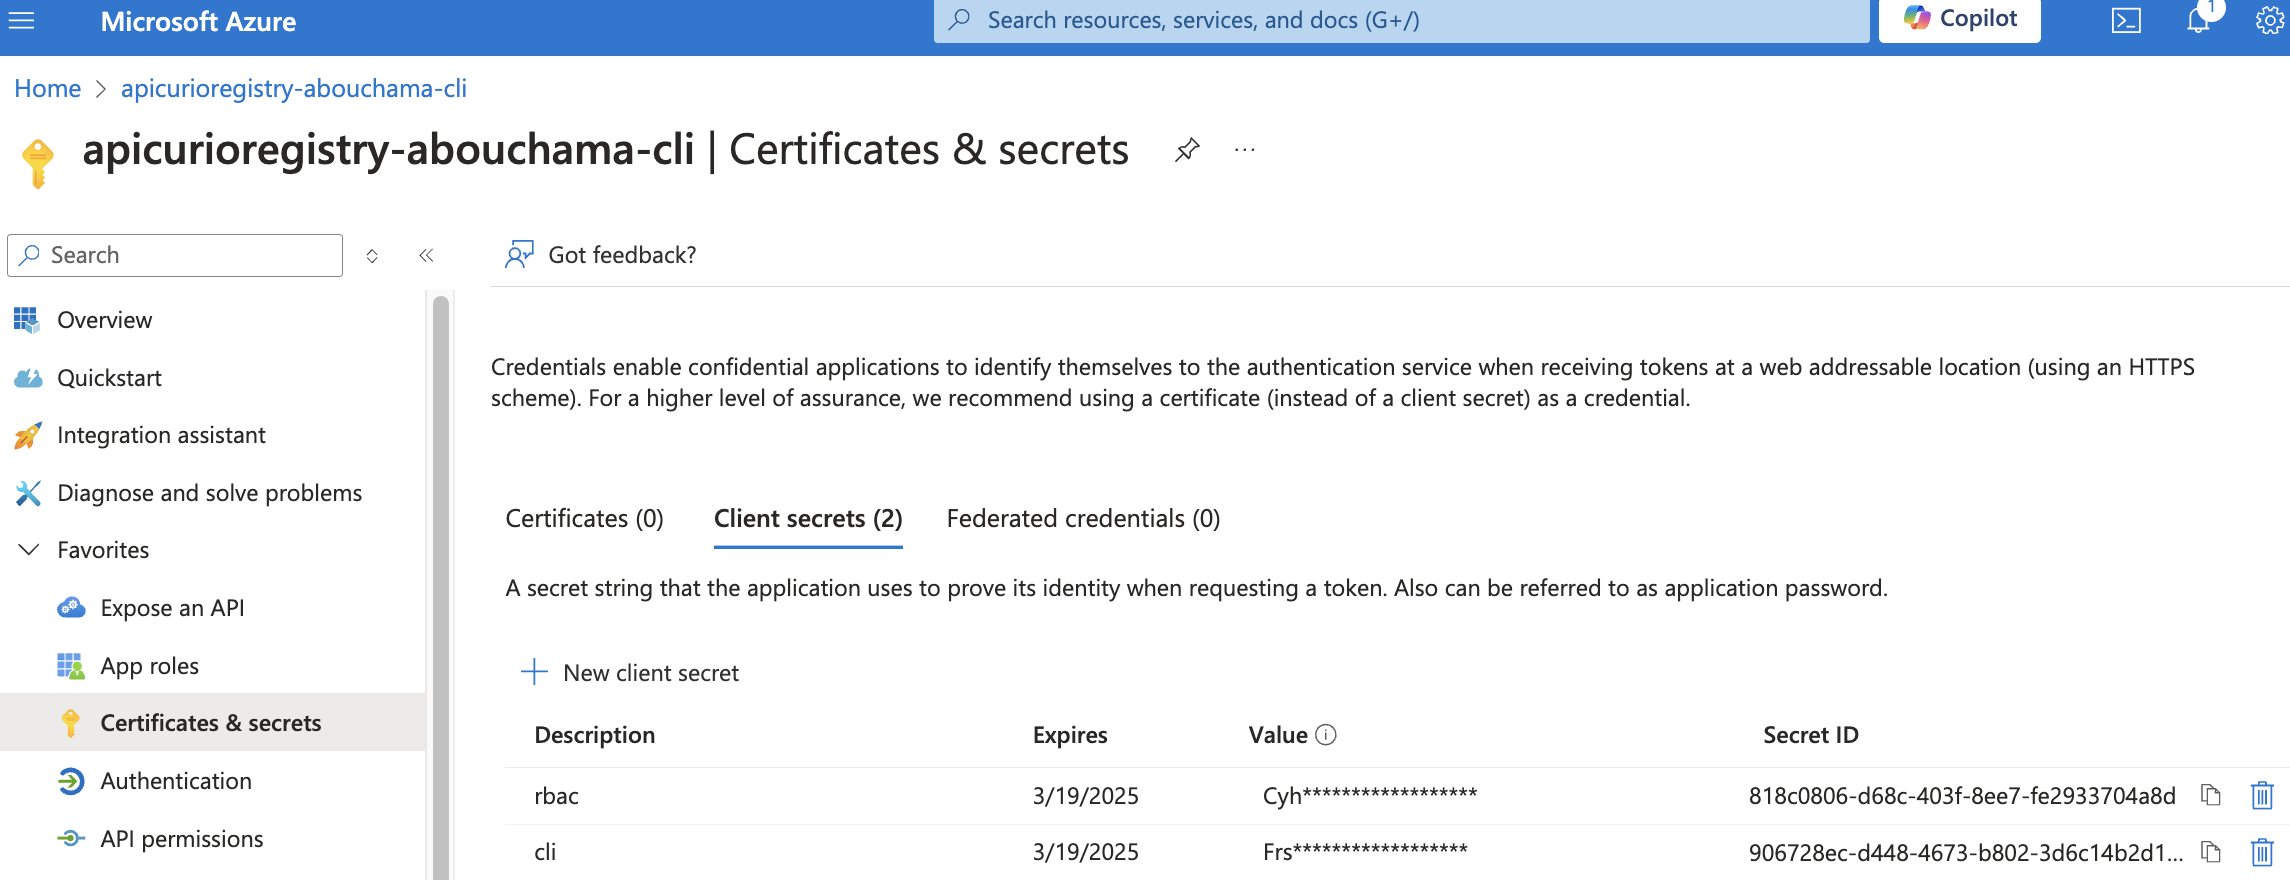
- In the
API permissions, add a new API Permission to your client application, and, inside this option, add the role you want to use. This role should have been created in the last section as an Application role in the Registry server app registration. This is done so the role is sent within the token. -
In your client identifying the application and in the one identifying the Registry server, in the API permissions section, you must grant admin consent for your directory. Note that it may take a few seconds for this to take effect.
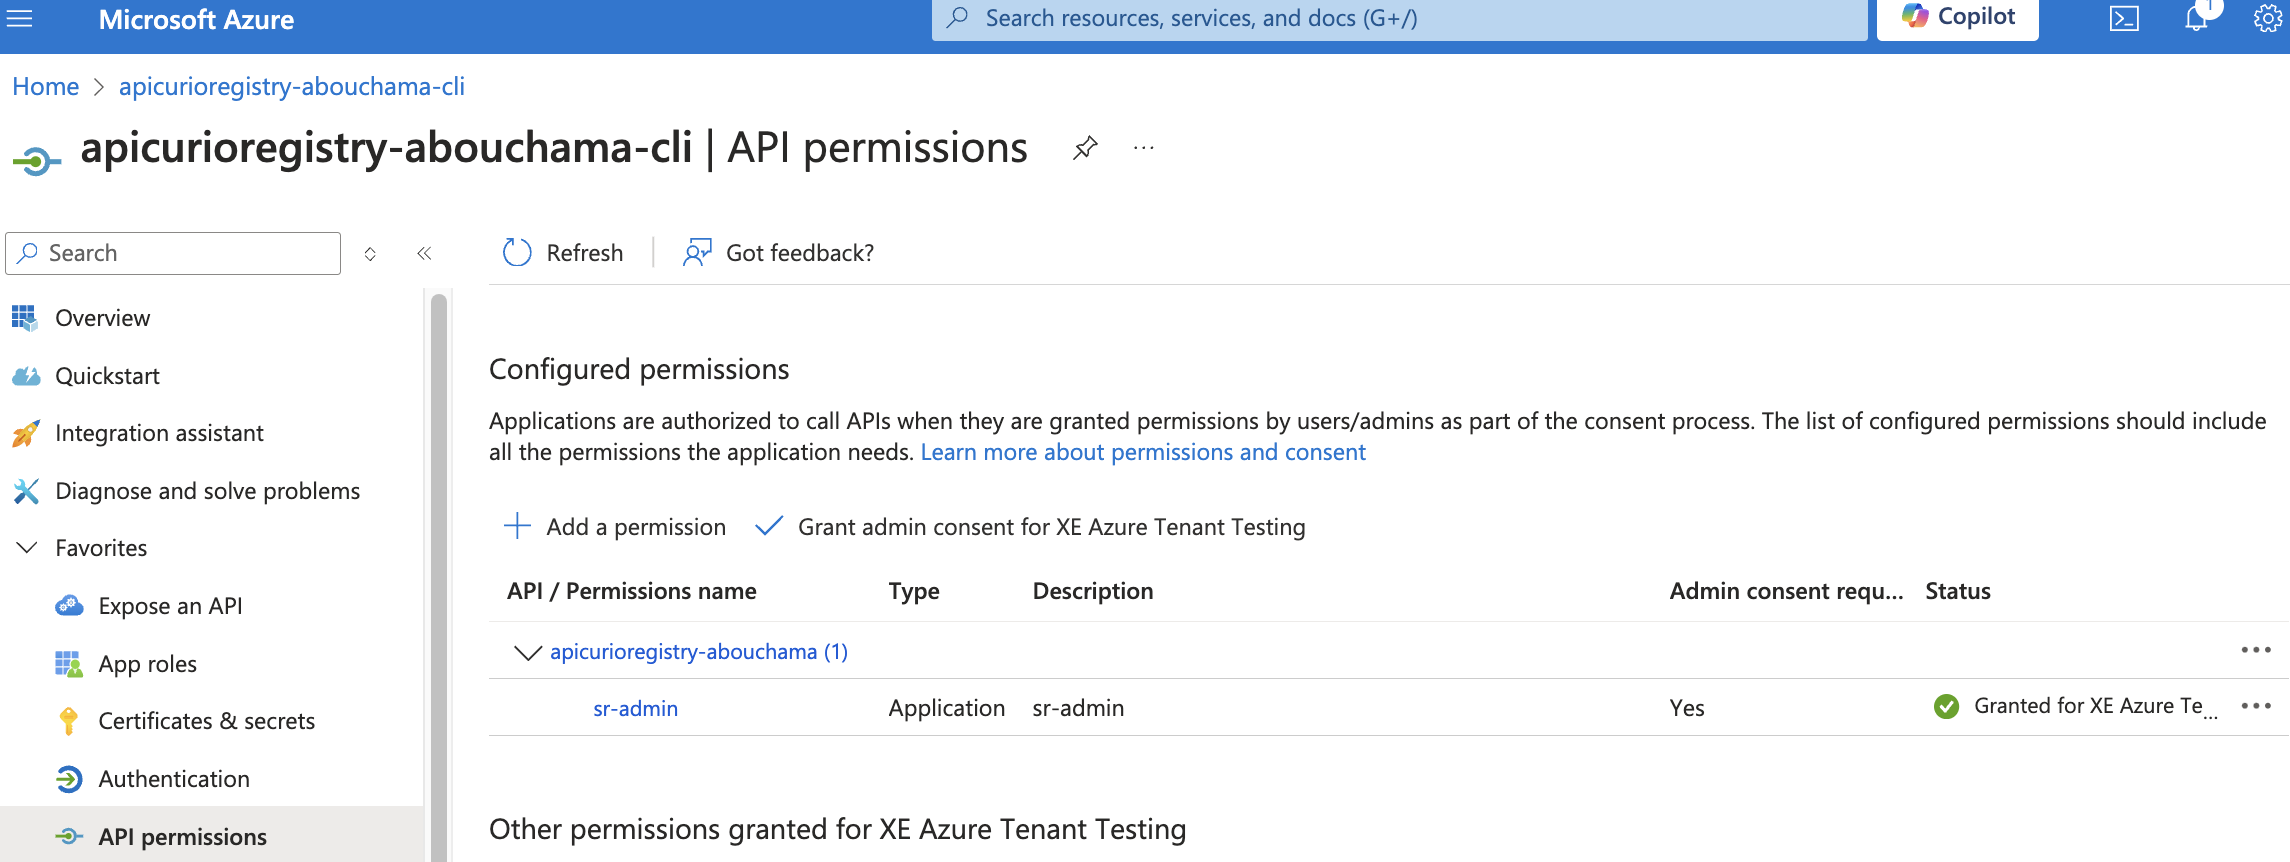
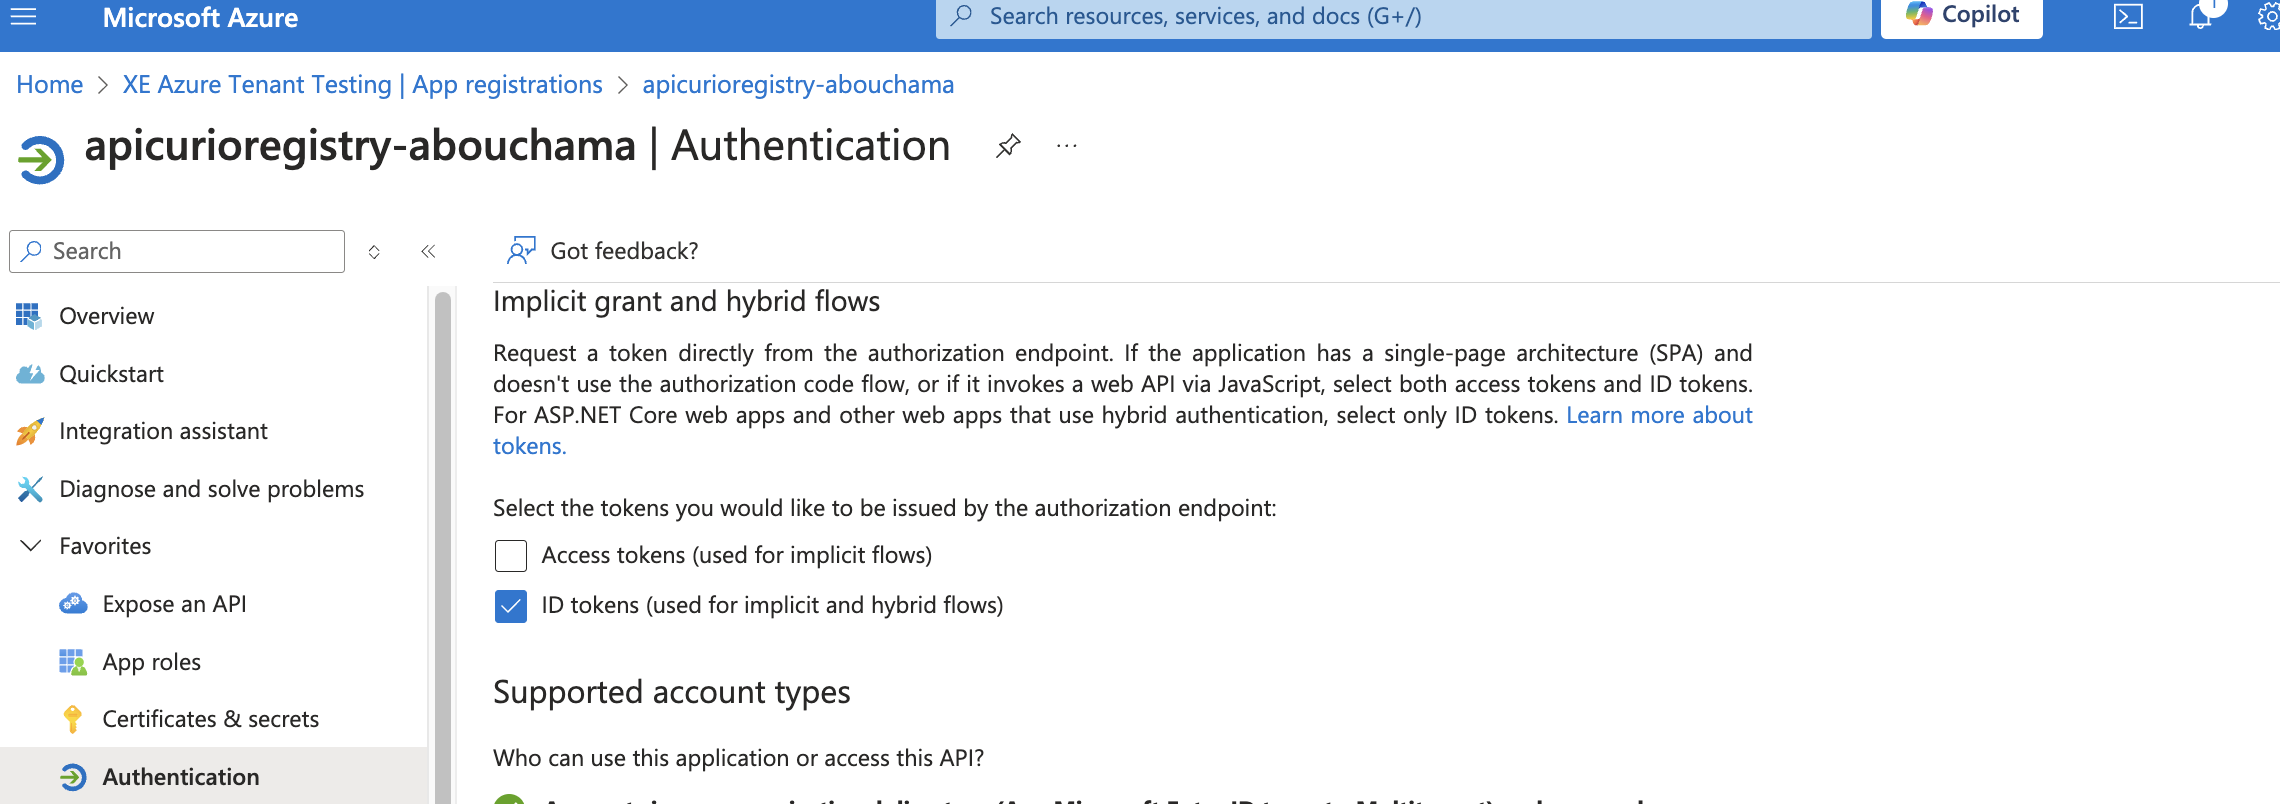
NOTE: The registration of Registry server application must have an exposed api and the box checked for ID tokens (used for implicit and hybrid flows)
2. Requesting a Token:
When your app wants to access the API, it sends a request to the API’s authentication server. It includes:
* The client ID.
* The client secret (value generated in certificates&secrets)
* A specific grant type, which is "client_credentials."
  curl -s -X POST \
    -H "Content-Type: application/x-www-form-urlencoded" \
    -d 'client_id=53d7fab9-8cbd-4c3b-84e8-d91a33eb90f8&scope=api://6ac8d309-0dcd-4aeb-b186-4911266038a8/.default&client_secret=Frs8Q~dUD8EwK2-RZ0JNEYS_Lbxlrs01m5F3tbx8&grant_type=client_credentials' \
    'https://login.microsoftonline.com/93a47e43-9ded-45a5-a855-eb462dd234b2/oauth2/v2.0/token'
The token generated has the following attributes:
-
token_type:"Bearer": This means that the type of token you received is a “Bearer” token. It’s like a special pass that you need to include when you access the API. -
expires_in:3599: This tells you how long the token is valid, in seconds. Here, it’s 3599 seconds (which is about 1 hour). After that, you’ll need to request a new token. -
ext_expires_in:3599: This is usually the same as expires_in, indicating the extended expiration time. It’s another way to say the token lasts for about 1 hour. -
access_token:"eyJ0eXAiOiJKV1QiLCJhbGciOiJSUzI1NiIsImtpZCI6...": This long string is the actual access token. It’s like the key that opens the door to the API. You’ll need to include this token in your requests to the API to access its resources.
Review Token Content:
Decode your JWT token (you can use tools like jwt.io) to inspect the claims. Check if the roles claims are included.

3. Interacting with the ApiCurio Registry API using Access Token:
response=$(curl -s -X POST -H "Content-Type: application/x-www-form-urlencoded" -d 'client_id=53d7fab9-8cbd-4c3b-84e8-d91a33eb90f8&scope=api://6ac8d309-0dcd-4aeb-b186-4911266038a8/.default&client_secret=Frs8Q~dUD8EwK2-RZ0JNEYS_Lbxlrs01m5F3tbx8&grant_type=client_credentials' 'https://login.microsoftonline.com/93a47e43-9ded-45a5-a855-eb462dd234b2/oauth2/v2.0/token'  | jq ".access_token")

ACCESS_TOKEN=$(echo "$response" | sed 's/^"//; s/"$//')
echo "$ACCESS_TOKEN"

MYREGISTRYURL=https://apicurioregistry-psql.registry.router-default.apps.com
Get list of groups
curl -k -v -X GET -H "Authorization: Bearer $ACCESS_TOKEN" \
  $MYREGISTRYURL/apis/registry/v2/groups
Creation of artifact:
curl -k -v -X POST -H "Content-Type: application/json; artifactType=AVRO" \
  -H "X-Registry-ArtifactId: share-price1" \
  -H "Authorization: Bearer $ACCESS_TOKEN" \
  --data '{"type":"record","name":"price","namespace":"com.example", \
   "fields":[{"name":"symbol","type":"string"},{"name":"price","type":"string"}]}' \
  $MYREGISTRYURL/apis/registry/v2/groups/my-group/artifacts
Get Artifacts:
curl -s -k -v GET -H "Authorization: Bearer $ACCESS_TOKEN" \
  $MYREGISTRYURL/apis/registry/v2/groups/my-group/artifacts
Get Details of an Artifact:
curl -s -k -v GET -H "Authorization: Bearer $ACCESS_TOKEN" \
  $MYREGISTRYURL/apis/registry/v2/groups/my-group/artifacts/share-price1
Useful links:
- Recording of Hands on Lab: https://drive.google.com/open?id=1DClnumPkmP2NFmOBhkYT0o9K8EAhCbXQ
- Blog https://www.apicur.io/blog/2023/07/13/registry-azure-ad
- Apicurio Registry API Definition: https://www.apicur.io/registry/docs/apicurio-registry/2.6.x/assets-attachments/registry-rest-api.htm#tag/Artifacts/operation/deleteArtifactsInGroup
Last, but not least, we still have a lot of things to do! As always, you can see the stuff we’re tracking by viewing the GitHub issues for the project.
If you find bugs or want to request a new feature, that’s a great place to start!