
The Apicurio Studio OpenAPI editor has been around for a long time, and over time support for vendor extensions has evolved somewhat. It started with:
"You can use the Source tab, good luck!"
Eventually we added a Vendor Extension section in various places, which made things a bit better. However, the UI was rather basic - just a list of the extensions with values displayed as raw JSON. Editing the values was also basic - simply a source editor for the raw JSON value of the extension.
We’ve made another incremental improvement in this area, which is to use form generation (via Formly) to generate a UI form used when editing the value of a vendor extension!
What are OpenAPI Vendor Extensions?
The OpenAPI specification defines a set of semantics for describing a REST API. Endpoints, data types, operations, inputs and outputs, etc are all concepts defined by the specification. These first order concepts are often all you need to fully define the shape of your API.
However, there may be aspects of your API that you want to define which go beyond the
common semantics defined by the OpenAPI specification.
In these cases, OpenAPI defines the concept of a Vendor Extension, which are open
ended property names that must begin with x-.
So imagine you want to define some API Management limits on your operations and you have a REST API platform that can inspect the OpenAPI to find the configured limits for any given operation. You might set rate limits for an operation directly in the OpenAPI like this:
openapi: 3.1.0
info:
    title: Example API
    version: 1.0
paths:
    /widgets:
        summary: Get a list of widgets.
        get:
            responses:
                '200':
                    $ref: '#/components/responses/WidgetListResponse'
                '500':
                    $ref: '#/components/responses/ServerError'
            operationId: listWidgets
            summary: List widgets
            x-apimanagement-rateLimit:
                rate: 100
                period: 'second'
                per: 'user'
Everything in the above example is standard OpenAPI semantics except for the
x-apimanagement-rateLimit API Management property, which is a vendor extension.
This example might indicate that the platform should apply a rate limit of 100
requests per second per user. Neat!
What inspired this feature?
Apicurio Studio will be included as a component of a new Red Hat product called Connectivity Link. This new product has a lot of functionality in the network connectivity and API management spaces, and one of the things it supports is enabling and configuring its various features by adding some vendor extensions to the OpenAPI document.
Another component of Connectivity Link is Kuadrant, which is an open source project that brings policy based application connectivity features to Kubernetes. That project defines some OpenAPI kuadrant extensions that you can use to configure things like routes and rate limits.
We thought it would be nice if users could use a form to enter the Kuadrant vendor extension values, rather than having to copy/paste the correct JSON from the Kuadrant documentation into the editor.
Wait, is this ONLY for Kuadrant?
Of course, we could have simply added UI support for Kuadrant vendor extensions. But that would only add support for this one specific type of extension. What we really wanted was a way to easily configure Studio to support a wide range of vendor extensions, without having to write code and release new versions. So what we’ve done is implement a dynamic form generation approach that allows you to configure Studio with a list of vendor extensions at deploy time. More details on that later.
OK but show me what it looks like!
Right, let’s show some stuff! Here’s what things used to look like in the editor:
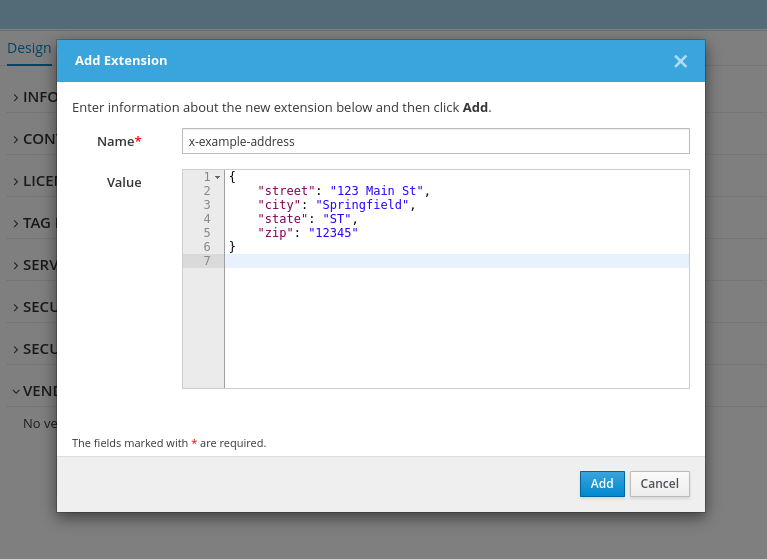
Notice that you have to provide the full vendor extension property name as well as the value in raw JSON format. It’s not great.
Now here’s what it looks like:
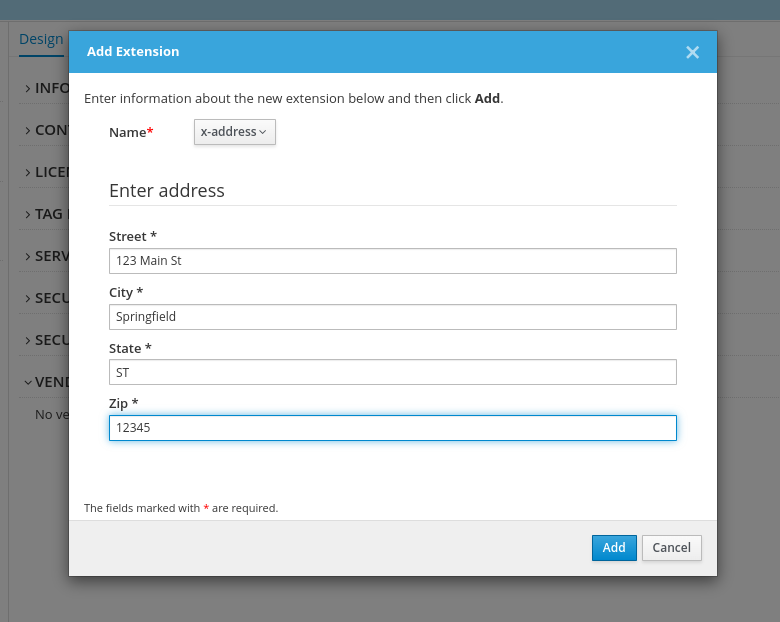
Cool!
How do I use this feature?
Unfortunately the feature isn’t magic, which means there is some configuration needed. Let’s dig into that in this final section.
Creating a vendor-extensions configuration
What you need to do is create a JSON file with the correct
information (for example vendor-extensions.json). You’ll need to create this
file and then eventually make it available to the Studio backend application
(see the next section).
The vendor extension configuration file is just a JSON file with an array of supported vendor extensions. Each vendor extension item in the array should have the following properties:
name: the name of the vendor extension property, which must begin withx-schema: a JSON schema that describes the format of the vendor extension valuemodel: a JSON object that is the default values for the vendor extension valuecomponents: an (optional) array of OpenAPI component names indicating valid placement of the vendor extension
Here is an example of this file (the one used in this blog post):
[
    {
        "name": "x-address",
        "schema": {
            "$schema": "http://json-schema.org/draft-07/schema#",
            "type": "object",
            "title": "Enter address",
            "properties": {
                "street": {
                    "title": "Street",
                    "type": "string"
                },
                "city": {
                    "title": "City",
                    "type": "string"
                },
                "state": {
                    "title": "State",
                    "type": "string",
                    "pattern": "^[A-Z]{2}$"
                },
                "zip": {
                    "title": "Zip",
                    "type": "string",
                    "pattern": "^[0-9]{5}$"
                }
            },
            "required": [
                "street",
                "city",
                "state",
                "zip"
            ]
        },
        "model": {
           "street": "",
           "city": "",
           "state": "",
           "zip": ""
        },
        "components": [
            "document"
        ]
    }
]
The above example has only a single vendor extension defined, but you can specify as many as you like.
Note that the components property allows you to specify where in the OpenAPI document
the vendor extension is valid. In the above example it will only appear when
adding a vendor extension to the root of the document. Other allowed values for this
are:
- schema
- response
- parameter
- header
- requestBody
- securityScheme
- pathItem
- operation
You get the idea!
When defining your JSON Schema for a vendor extension, we recommend making sure you
have a title defined for each property. This will allow the form generator to create
appropriate labels in the UI. See the Formly documentation for more information.
Telling Studio where the configuration is
Now that you have a vendor-extensions configuration file created, you need to tell
Studio where it lives. You can do this by setting the APICURIO_UI_OPENAPI_VENDOR-EXTENSIONS_URL=
environment variable when starting up Studio. For example:
docker run -it -p 8080:8080 –env APICURIO_UI_OPENAPI_VENDOR-EXTENSIONS_URL=”https://raw.githubusercontent.com/Apicurio/apicurio-studio/0f81ea54bcf780daff59f5ea78c7990c6a4221f9/app/src/main/resources/extensions/address.json” apicurio/apicurio-studio:latest-snapshot
Any valid URL that can be resolved by the application should work. Just be careful of using local file paths when running a docker image - if you want that to work then you’ll obviously need to mount the file into the container.
Conclusion
Thanks for reading. This feature is still in Beta and can do with some feedback and iteration. If you feel so inspired, please give it a try and let us know how it can be improved (oh let me count the ways).
Cheers!