Using a Local Installation of GitLab
Apicurio Studio integrates with several other systems to perform certain specific tasks. One of these systems is GitLab, allowing users to publish their API Designs into a git repository. By default, Apicurio Studio integrates with the public cloud version of GitLab. However, some users may want to download and install their own local copy of GitLab and still have Apicurio Studio integrate with it. This article describes the steps necessary to accomplish this.
At a high level there are three areas of configuration that are required for this to work:
- Configure Apicurio Studio to use the local installation of GitLab instead of gitlab.com
- Configure Keycloak to authenticate/account link with the local installation of GitLab
- Configure the local GitLab installation to accept authentication/authorization requests from Keycloak
1. Configure Apicurio Studio
Configuring Apicurio Studio for use with a local GitLab installation is trivial. Apicurio Studio performs all operations via the GitLab API, which is located at a specific endpoint URL. By default, Apicurio Studio uses the public, cloud based version of GitLab. But to use a local installation of Apicurio, you’ll need to override this default by configuring a system property (or environment variable). If you would like to use a system property, use this:
-Dapicurio.hub.gitlab.api=https://gitlab.example.com
You would obviously replace the URL above with the appropriate URL to your local GitLab installation. Alternatively you can set an environment variable:
APICURIO_GITLAB_API_URL="https://gitlab.example.com"
export APICURIO_GITLAB_API_URL
Additionally, in order for Apicurio Studio to recognize local GitLab URLs so that it can properly import them when a user is performing the Import API action using a URL as input, Apicurio Studio must be configured with GitLab’s web URL. Usually the web URL is the same as the GitLab API URL, but it is configured via a separate system property/environment variable to support the rare case where it is different.
-Dapicurio.hub.gitlab.url=https://gitlab.example.com
or
APICURIO_GITLAB_URL="https://gitlab.example.com"
export APICURIO_GITLAB_URL
Customize the URL
The example settings above assume that your local GitLab installation can be found at gitlab.example.com - obviously you must replace that domain name with the location of your actual installation.
2. Configure Keycloak
Note about configuring Keycloak
You must configure Keycloak and GitLab at the same time (e.g. in multiple browser tabs). So be aware that steps #2 and #3 should be performed in parallel.
Keycloak must be configured to include GitLab as an Identity Provider. Log in to your Keycloak console and navigate to the realm’s Identity Provider section by clicking the appropriate link in the vertical navigation (on the left). From there, add a new provider of type OpenID Connect v1.0. In the resulting form, set the appropriate values. Note that the various URLs, as well as the Client ID and Secret, will be specific to your GitLab installation. This is why those values are redacted in the screenshot below:
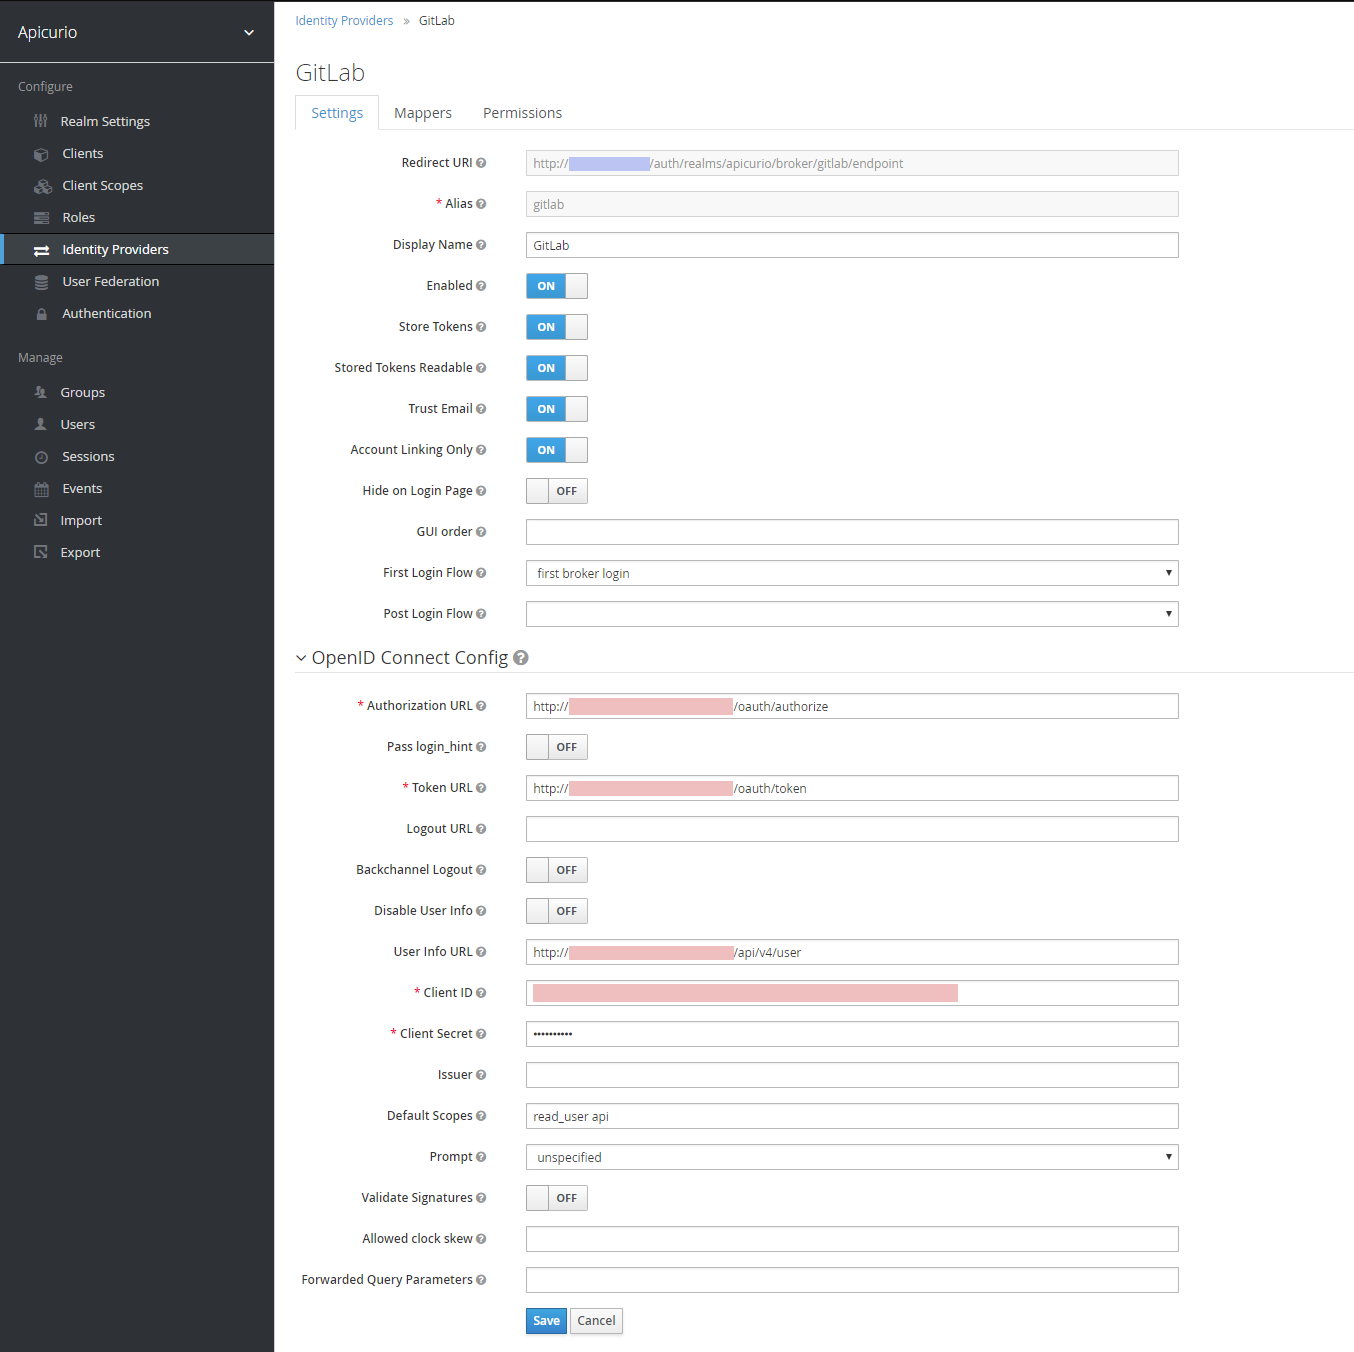
As the screenshot above shows, the following important form fields should have the following values:
- Alias - gitlab
- Display Name - GitLab
- Enabled - ON
- Store Tokens - ON
- Stored Tokens Readable - ON
- Trust Email - ON
- Account Linking Only - ON
- Hide on Login Page - OFF
- Authorization URL - https://gitlab.example.com/oauth/authorize
- Token URL - https://gitlab.example.com/oauth/token
- User Info URL - https://gitlab.example.com/api/v4/user
- Client ID - «copied from the GitLab UI (see config section #3 below)»
- Client Secret - «copied from the GitLab UI (see config section #3 below)»
- Default Scopes - read_user api
Customize the above values!
Some of the values above are examples only. Specifically, the Authorization, Token, and User Info URLs should all be customized with the domain name of your local GitLab installation. Also the Client ID and Client Secret values should be copied from the GitLab UI - these values are available after you create an Application in GitLab (see step #3 below).
After configuring the new Identity Provider with the appropriate values, click Save and the GitLab identity provider will be created. At this point Keycloak knows how to create a link between Keycloak and your local GitLab server!
GitLab Social Login
If you would like to use GitLab as a social login provider, you can do that! However, at the time of this writing there is a Keycloak bug that must be worked around. For more information, see this GitHub discussion.
3. Configure (local) GitLab
Finally, you must create an Application in GitLab so that Keycloak can make an OAuth connection between itself and GitLab. This is done by logging into your local GitLab installation and navigating to your user’s Settings page, then clicking on the Applications link in the vertical navigation. This section of the GitLab UI will allow you to create a new OAuth Application, with a set of allowed scopes and a generated Client ID and Client Secret. Simply fill out the form with appropriate values and click Save application when you are done. See below for configuration details:
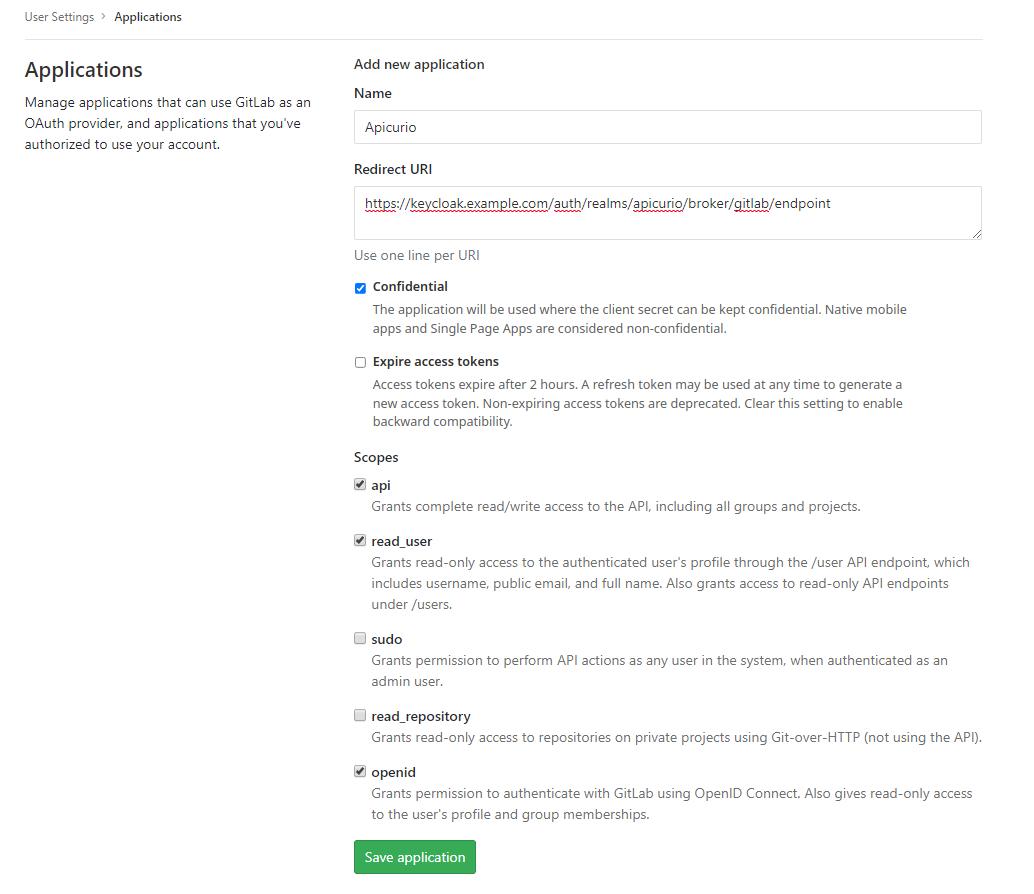
You will need to provide the following information in the form:
- Name - Apicurio
- Redirect URI - https://keycloak.example.com/auth/realms/apicurio/broker/gitlab/endpoint
- Confidential - typically set to enabled
- Expire access tokens - should currently be set to disabled (until we can properly support refresh tokens)
- Scopes - api, read_user, openid
Redirect URI
Note that you can simply copy/paste the Redirect URI from Keycloak - you will find it in the Add identity provider form as the first (read only) field.
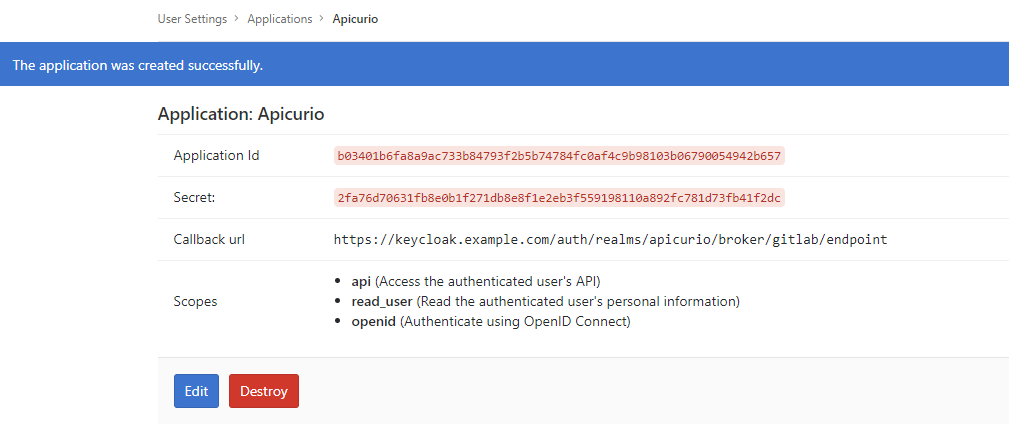
Once you click the Save application button, the application will be created and you will be shown the generated Client ID and Client Secret. These values are needed in configuration step #2 above, which is why steps 2 and 3 should be done in parallel.